
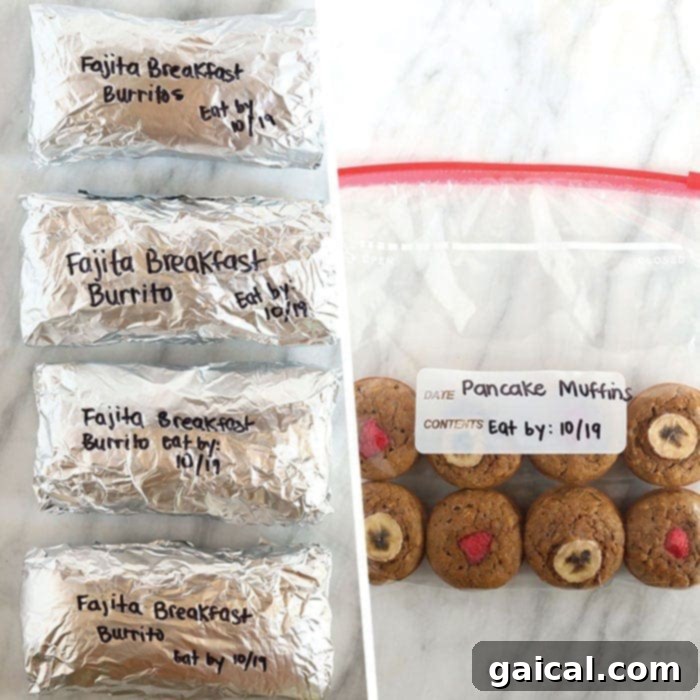
Are you tired of rushed mornings and skipping the most important meal of the day? Do you dream of a freezer stocked with delicious, healthy breakfast options that are ready in minutes? You’ve come to the right place! This comprehensive guide is designed to revolutionize your morning routine by teaching you how to transform your favorite breakfast recipes into convenient, freezer-friendly meals.
Unlock the secret to stress-free mornings with our extensive collection of meal prep breakfast recipes. We’ll show you how to easily prepare, freeze, and reheat a variety of dishes, ensuring a nutritious and satisfying start to your day, every day. Say goodbye to breakfast dilemmas and hello to effortless, wholesome eating!
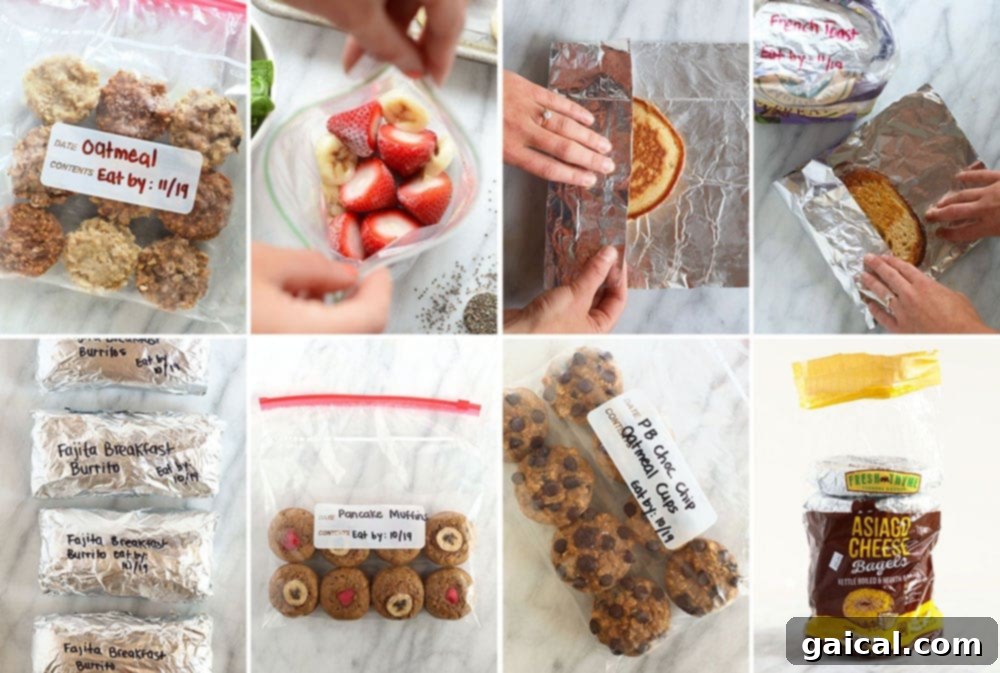
Welcome to our EPIC make-ahead breakfast post! Here, we unveil the ultimate strategies for simplifying your morning routine. We’re not just sharing recipes; we’re empowering you to master the art of breakfast meal prepping. This guide will walk you through preparing and freezing 8 popular, wholesome breakfast recipes, ensuring your freezer is consistently stocked with nourishing, ready-to-eat options.
Why Embrace Make-Ahead Breakfasts?
Imagine this: an entire freezer brimming with perfectly portioned, already-made breakfast recipes, waiting to be defrosted and enjoyed whenever and wherever you desire. Sounds like a dream, right? We are huge advocates for meal prepping, especially when it comes to breakfast, and for myriad compelling reasons:
- Grab & Go Convenience: In our fast-paced lives, time is a precious commodity. Having ready-to-eat meals means you can simply grab and go, eliminating morning rush and ensuring you never skip breakfast again. This convenience significantly reduces morning stress and allows you to start your day calmly and efficiently.
- Healthier Choices, Simplified: Make-ahead and freezer-friendly recipes are your secret weapon for maintaining a healthy diet. By preparing meals in advance, you control the ingredients, portions, and nutritional content. This proactive approach helps you avoid unhealthy impulse purchases or relying on sugary, processed options when hunger strikes.
- Streamlined Meal Planning: Integrating make-ahead breakfasts effortlessly into your weekly meal plan saves invaluable time and mental energy. It takes the guesswork out of what to eat each morning, allowing for a more structured and less stressful approach to your entire week’s nutrition.
- Significant Cost Savings: Preparing meals in bulk and utilizing ingredients before they spoil can lead to substantial savings. You’ll reduce your grocery bill by avoiding last-minute, expensive breakfast purchases from coffee shops or convenience stores.
- Reduced Food Waste: By planning and preparing meals ahead, you’re more likely to use all your ingredients, especially perishable items like fruits and vegetables, before they go bad. This minimizes food waste, which is beneficial for both your wallet and the environment.
Essential Make-Ahead & Freezer Breakfast Tips
Maximize your efficiency, conserve energy, and save money with these fundamental make-ahead and freezer meal preparation strategies!
- Rescue Nearly-Expired Produce: Don’t let precious fruits go to waste! If you have a bunch of bananas browning on the counter or cartons of berries nearing their prime, freeze them immediately. Frozen fruits are perfect for smoothies, baked goods, or even oatmeal. For a detailed guide on how to freeze bananas effectively, check out this helpful post.
- Stock Up on Sale Bread: Keep an eye out for sales on your favorite bread varieties. Buying a few loaves when they’re discounted and freezing them for later ensures you always have a staple on hand, saving you an extra trip to the store when you’re short on time.
- Seal Food Tightly to Prevent Freezer Burn: This is perhaps the most crucial tip for maintaining the quality of your frozen meals. Air is the enemy of frozen food, causing freezer burn, which can degrade texture and flavor. Always ensure you seal your food as tightly as possible, expelling all excess air before freezing.
Speaking of sealing food correctly, here are a few essential freezer tools that will make your meal prepping experience much smoother:
- Freezer-Safe Gallon-Size Bags: Indispensable for larger items or multiple servings.
- Tin Foil: Excellent for individual wrapping, offering an extra layer of protection.
- Stasher Bags: Reusable silicone bags, an eco-friendly alternative for freezing.
- Sharpie: Essential for clear labeling, ensuring you always know what’s inside and when it needs to be eaten.
- Double or Triple Your Batches: When you’re already in the kitchen, why not maximize your efforts? Instead of preparing just one batch of breakfast burritos or pancakes, make two or even three. This “cook once, eat many times” approach saves significant time and energy in the long run, giving you a greater supply of ready-to-eat meals.
- Embrace Ingredient Flexibility: Don’t be rigidly tied to a recipe. If a recipe calls for raspberries but you have an abundance of blueberries, use what you have on hand! This flexibility not only prevents food waste but also encourages creativity in the kitchen.
- Label with “Eat By” Dates: Organization is key to a well-managed freezer. Always clearly label your frozen food with its contents and an “eat by” date. This ensures food safety and quality, helping you avoid mystery meals and keep your freezer inventory fresh.
With these foundational tips in mind, you’re now ready to dive into our collection of 8 incredible healthy meal prep breakfast recipes. Each tutorial below provides simple instructions on how to make, freeze, and enjoy these dishes later. Get ready to transform your mornings and embrace happy meal prepping!
Savory Bagel Ham and Cheese Quiches
If you’re a devoted fan of savory breakfasts, these Freezer Bagel Quiches are about to become your new obsession. These perfectly portioned quiches cleverly utilize your favorite bagels as their delicious, crispy crusts, filled with a delightful blend of savory ham, rich cheese, and fluffy eggs. They are incredibly satisfying and a fantastic way to enjoy a hearty breakfast with minimal fuss. Find the complete recipe details HERE and follow our simple steps below to make them ahead and freeze them for future enjoyment.
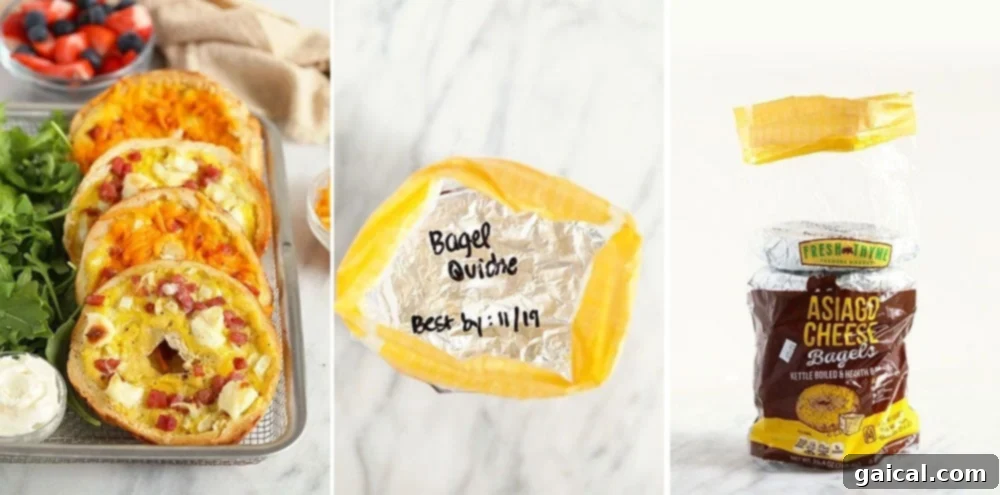
- First, prepare a full batch of our scrumptious Bagel Ham and Cheese Quiches. You’ll need a total of 6 bagels for this recipe. Remember to save the original bagel packaging sleeve; it will come in handy for freezing!
- Once baked, allow each of the bagel quiches to cool completely on a wire rack. This is crucial to prevent condensation and ice crystals during freezing.
- Next, individually wrap each bagel quiche half tightly in tin foil, making sure to remove as much air as possible around the quiche to prevent freezer burn.
- Label Clearly: Using your Sharpie, write “Ham and Cheese Bagel Quiche” on each foil-wrapped bagel, along with the “eat by” date (we recommend 3 months from the preparation date).
- Carefully place the wrapped bagels back into the plastic bagel sleeve they originally came in. Press out any remaining air from the sleeve and seal it securely with a rubber band or a twist tie.
- Freeze for up to 3 months for optimal freshness and quality.
- Thaw/Reheat Instructions: When ready to enjoy, remove a bagel quiche from the freezer and unwrap it.
- Place it directly into a toaster oven and toast on a high setting for a few minutes until heated through and the crust is crispy. Alternatively, you can defrost it in the microwave for 1-2 minutes until warm.
Peanut Butter Chocolate Chip Oatmeal Cups
Baked oatmeal cups are a powerhouse of nutrition, packed with wholesome whole grains, essential fiber, and incredible flavor. Our peanut butter chocolate chip baked oatmeal cups are a consistent fan favorite, delivering a delightful blend of sweet and nutty flavors. They’re so good, you’ll want to keep them stocked in your freezer year-round for an effortless, healthy breakfast or snack. Grab the full recipe HERE and then learn the simple steps to prepare and freeze them below.
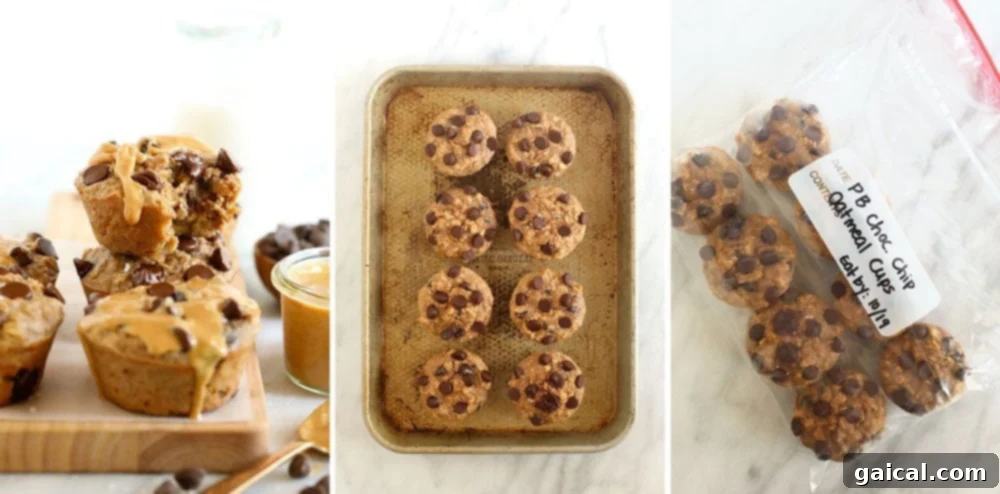
- First, prepare a batch of our delightful peanut butter chocolate chip baked oatmeal cups. Once baked, allow them to cool completely to room temperature.
- Arrange the cooled oatmeal cups on a baking sheet in a single layer. Place the baking sheet into the freezer for 30 minutes to 1 hour. This “flash freezing” step prevents them from sticking together when stored in a bag.
- Label for Success: On a freezer-safe gallon-size bag, clearly write “Peanut Butter Chocolate Chip Oatmeal Cups” along with the “eat by” date (3 months from your preparation date).
- Once the oatmeal cups are fully frozen and firm, transfer them from the baking sheet into the labeled plastic bag. Remove as much air as possible from the bag before sealing it securely.
- Store in the freezer for up to 3 months.
- Thaw/Reheat Instructions: To enjoy, place 2 frozen oatmeal cups on a microwave-safe plate. Defrost in the microwave for 1-2 minutes, or until heated through. For a slightly crispier exterior, you can finish them in a toaster oven.
Effortless Sheet Pan French Toast (Full Sleeve!)
Have you ever wished for a simple way to prepare make-ahead French toast? Your prayers have been answered with this incredibly easy tutorial on how to make meal-prep sheet pan French toast. This method allows you to prepare an entire sleeve of bread in one go, making it perfect for batch cooking and freezing. Enjoy classic French toast flavors without the morning scramble! Access the full recipe HERE and discover our straightforward instructions for making and freezing it below.
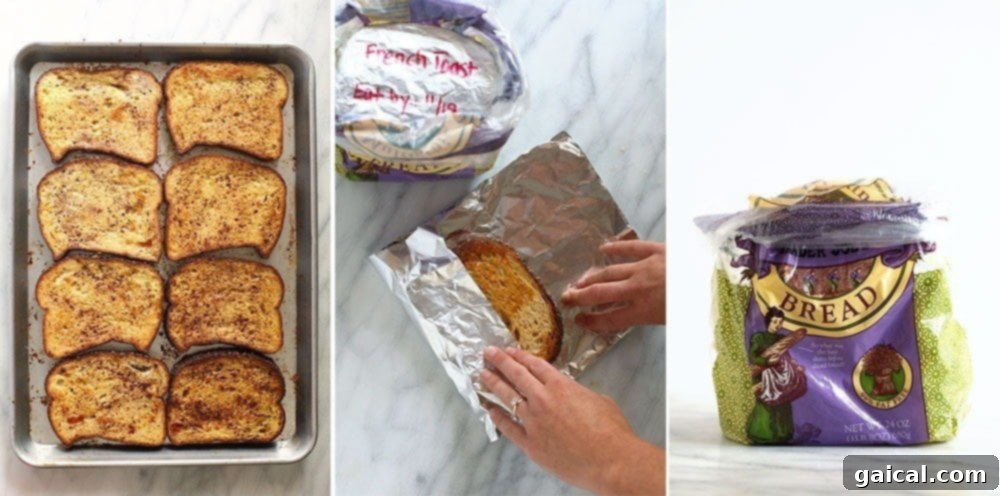
- Begin by either doubling our Sheet Pan French Toast recipe or simply converting your entire sleeve of bread into French Toast. Don’t forget to keep the plastic sleeve the bread came in; it will be useful for storage.
- Once cooked, allow all French toast pieces to cool completely on a wire rack. This prevents moisture buildup when freezing.
- Next, take two pieces of French toast (which typically constitutes one serving) and wrap them together tightly with a piece of tin foil. Repeat this process for all remaining pieces of French toast, creating individual serving packets.
- Label for Convenience: On the tin foil of each French toast packet, clearly write “French Toast” along with the “eat by” date (3 months from the time you prepared it).
- Carefully place the individually wrapped French toast pairs back into the original bread bag. Press out as much air as possible from the bag and seal it securely with a rubber band or twist tie.
- Freeze for up to 3 months.
- Thaw/Reheat Instructions: To thaw and reheat, remove a serving of French toast from the freezer.
- Remove the tin foil and let the French toast sit at room temperature for a few minutes. This makes it easier to separate the two pieces.
- Place the French toast in a toaster or toaster oven and toast for a few minutes until warm and slightly crispy. Alternatively, you can defrost and warm them in the microwave.
Wholesome Banana Pancake Muffins
Can’t decide between fluffy pancakes or convenient muffins for breakfast? Why not have the best of both worlds with our delightful Healthy Banana Pancake Muffins! These innovative muffins combine the light texture of pancakes with the portability of muffins, all while being packed with wholesome ingredients like whole grains. They are an excellent freezer-friendly option, perfect for an easy, nutritious grab-and-go breakfast whenever you need it. Get the full recipe HERE and follow our simple freezing instructions below.
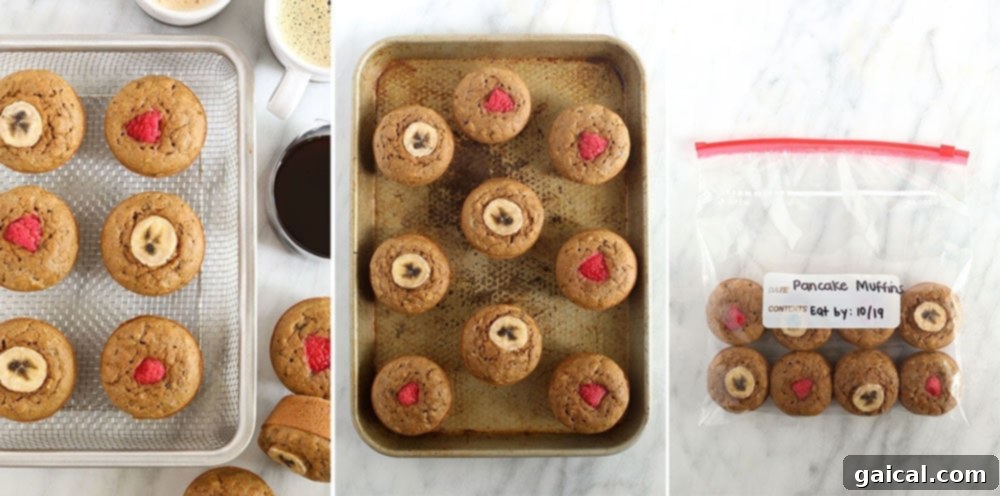
- First, prepare a batch of our delicious Banana Pancake Muffins according to the recipe. After baking, ensure the pancake muffins cool completely on a wire rack before proceeding.
- Arrange the cooled muffins on a baking sheet in a single layer. Place the baking sheet in the freezer for 30 minutes to 1 hour to flash freeze them. This step prevents them from sticking together when stored.
- Label Clearly: Prepare a freezer-safe gallon-size bag by writing “Banana Pancake Muffins” on it, along with the “eat by” date (3 months from your preparation date).
- Once the muffins are frozen solid, transfer them from the baking sheet into the labeled plastic bag. Press out as much air as possible from the bag before sealing it tightly.
- Store in the freezer for up to 3 months.
- Thaw/Reheat Instructions: To enjoy, remove the desired number of muffins from the freezer bag and place them on a microwave-safe plate. Defrost in the microwave for 1-2 minutes, or until warmed through. For a delightful texture, you can briefly warm them in a toaster oven after microwaving.
Batch Cook & Freeze Steel Cut Oatmeal
Steel-cut oatmeal is renowned for its healthy benefits and wonderfully chewy texture, but its cooking time can be a deterrent on busy mornings. The good news is you can easily make a large batch of steel-cut oatmeal (or any type of oatmeal) and freeze it in convenient muffin tin portions. This method provides an incredibly easy thaw-and-reheat breakfast option for any day of the week, saving you precious time without compromising on nutrition or flavor. Learn how to make oatmeal in every possible way HERE, then discover our freezing tutorial below.
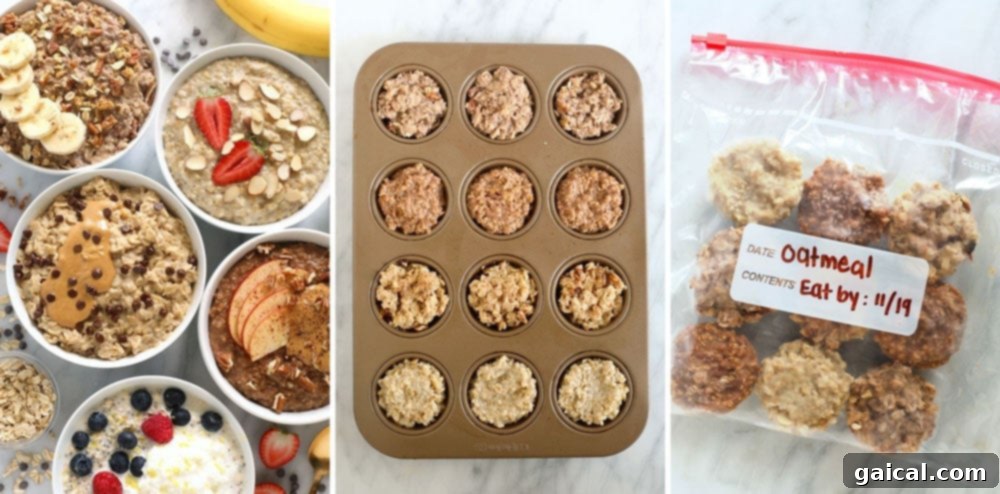
- First, prepare a batch of your favorite oatmeal. You can find our top basic oatmeal recipes HERE, including steel-cut options.
- Allow the cooked oatmeal to cool completely to room temperature. This step is vital to prevent steam from forming ice crystals in the freezer.
- Generously spray a standard muffin tin with nonstick cooking spray. This will help prevent the frozen oatmeal from sticking.
- Spoon the cooled oatmeal into each muffin cup, filling them all the way to the top to create full, satisfying portions.
- Place the filled muffin tin in the freezer and freeze for at least 2 hours, or ideally, overnight, until the oatmeal portions are completely solid.
- Once frozen, remove the muffin tin from the freezer. Let it sit on the countertop for about 10 minutes to slightly thaw the edges, making removal easier. Alternatively, you can run warm water over the bottom of the muffin tin to loosen the oatmeal cups.
- Carefully remove each oatmeal cup from the muffin tin (a butter knife works perfectly to pop them out). Transfer the frozen oatmeal cups into a freezer-safe gallon-size bag.
- Remove as much air from the bag as possible before sealing it tightly.
- Label Clearly: Write “Oatmeal” on the bag along with the “eat by” date (3 months from the time you made it).
- Freeze for up to 3 months.
- Thaw/Reheat Instructions: To thaw and reheat, remove 2-3 frozen oatmeal cups from the freezer bag and place them into a microwave-safe bowl.
- Defrost in the microwave for 2-3 minutes using a defrost setting, then microwave on high for an additional 30-60 seconds, stirring occasionally, until heated through and creamy. Add a splash of milk if desired for consistency.
Zesty Fajita Breakfast Burritos
There’s truly nothing better than a hearty, flavor-packed breakfast burrito to kickstart your day. Our incredibly delicious Fajita Breakfast Burritos recipe yields 8 generously sized burritos, making it an ideal candidate for batch cooking. Let’s get cooking so you can effortlessly freeze these savory delights for later, ensuring you have a satisfying meal ready in minutes. Access the full recipe details HERE and then learn how to perfectly make and freeze them below.
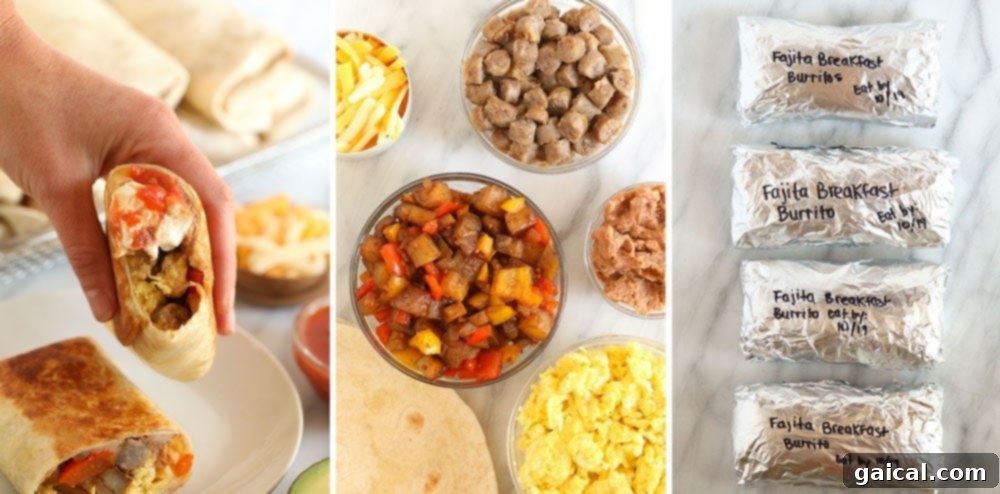
- First, prepare a batch of our vibrant Fajita Breakfast Burritos according to the recipe. Once assembled, allow them to cool completely to prevent condensation when freezing.
- Tightly wrap each individual burrito in a piece of plastic wrap, pressing out as much air as possible to create a snug seal. Then, wrap each plastic-wrapped burrito again in a layer of tin foil for double protection against freezer burn.
- Label and Date: On the tin foil of each burrito, clearly write “Fajita Breakfast Burrito” along with the “eat by” date (3 months from your preparation date).
- Transfer the individually wrapped burritos into a large freezer-safe gallon-size bag. Remove as much air as possible from the bag before sealing it tightly.
- Freeze for up to 3 months.
- Thaw/Reheat Instructions: To thaw and reheat, unwrap one frozen burrito (making sure to remove both the tin foil and plastic wrap). Place it on a microwave-safe plate and defrost in the microwave for 2-3 minutes, flipping halfway, until heated through. For a crispier exterior, you can finish it in a hot pan or oven after microwaving.
Fluffy Healthy Pancakes
Love the comforting taste of pancakes but dread the time and effort required to make them from scratch every morning? We have the perfect solution! Simply prepare a double or triple batch of one of our delectable healthy pancake recipes and freeze them in single-serving portions for later. Enjoy light, fluffy pancakes whenever you crave them, with almost no effort. Discover 6 of our favorite healthy pancake recipes HERE, and then learn how to effectively make and freeze them below.
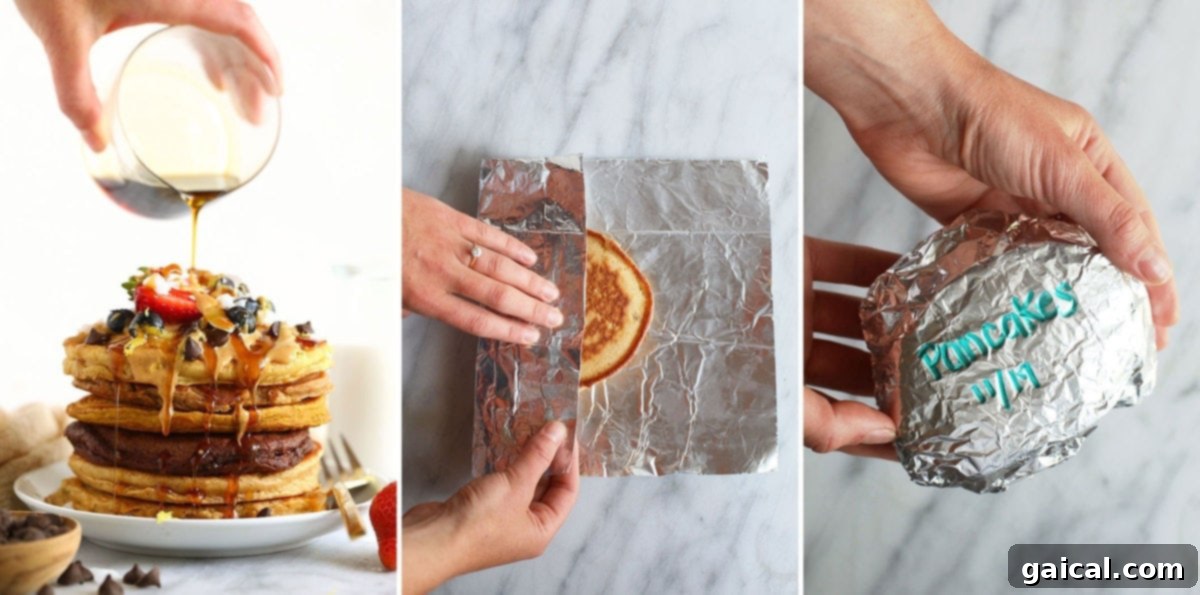
- First, prepare a batch (or better yet, a double batch!) of one of our delicious healthy pancake recipes.
- Once cooked, spread the pancakes out on a wire rack and allow them to cool completely to room temperature. This prevents sogginess when freezing.
- Next, take two pancakes (a typical serving size) and wrap them tightly together with a piece of tin foil. This individual wrapping helps protect them from freezer burn and makes reheating easier.
- Label and Store: On the tin foil of each pancake packet, clearly write “Pancakes” along with the “eat by” date (3 months from the time you made them).
- Repeat this wrapping and labeling process until all your pancakes are portioned and ready for the freezer.
- Freeze for up to 3 months.
- Thaw/Reheat Instructions: To thaw and reheat, remove a pair of pancakes from the freezer.
- Remove the tin foil and let the pancakes sit for a few minutes at room temperature, which will help you separate them easily.
- Place the pancakes in a toaster or toaster oven and toast for a few minutes until they are warm and slightly crispy. Alternatively, you can defrost and warm them in the microwave.
Pre-Portioned Strawberry Banana Spinach Smoothies
While smoothies are generally a quick breakfast option, you can make them even faster and more convenient by prepping your smoothie ingredients in a bag. This ingenious method means all you’ll need to do on busy mornings is add milk and blend! Our Strawberry Banana Spinach Smoothie bags are packed with nutrients and flavor, making healthy eating incredibly simple. Access the full recipe HERE and follow our steps below to create your make-ahead smoothie freezer bags.
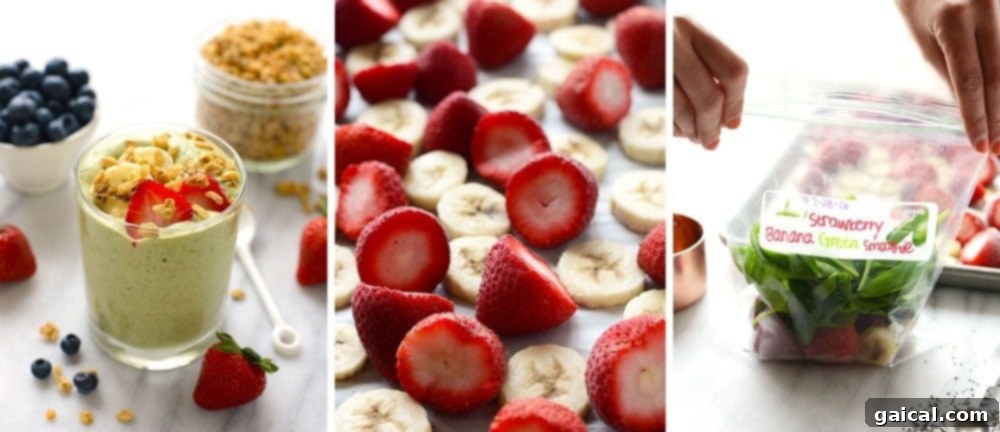
- Follow the specific “for the bag instructions” provided in THIS post to assemble your strawberry banana spinach smoothie freezer bags. This involves portioning out all the fruit and spinach into individual bags.
- Once assembled, clearly write “Strawberry Banana Green Smoothie” on each bag along with the “eat by” date (3 months from the time you prepared it).
- Remove as much air as possible from each bag before sealing it tightly. This prevents ice crystals and keeps ingredients fresh.
- Freeze for up to 3 months.
- To Make Your Smoothie: When you’re ready to enjoy, remove one prepped bag from the freezer and dump all its contents directly into a high-speed blender.
- Add approximately 1/2 cup to 1 cup of unsweetened almond milk (or your preferred milk) and 2 tablespoons of your favorite protein powder to the blender (optional, but recommended for an extra boost).
- Blend on high for about 1 minute, or until completely smooth and creamy. Enjoy your instant, nutritious smoothie!
Explore More Make-Ahead Breakfast Recipes
Hungry for even more delicious and convenient make-ahead breakfast ideas? Explore these additional recipes from our collection, all perfectly suited for freezing and enjoying later! Expand your meal prep repertoire and keep your freezer stocked with variety.
- Oatmeal Chocolate Chip Pancakes
- Healthy Blueberry Waffles
- Healthy Chocolate Muffins
- Protein Waffles
- Make Ahead Breakfast Burritos (Video Tutorial)
- Pumpkin Pie Slow Cooker Steel Cut Oatmeal
- Coconut Flour Pancakes
- Egg in a Frame
- Protein-Packed Breakfast Burritos
By incorporating these make-ahead breakfast strategies into your routine, you’re not just preparing food; you’re investing in calmer mornings, healthier eating habits, and a more organized lifestyle. Enjoy the freedom and deliciousness that comes with a freezer full of ready-to-eat breakfasts!