
What I’m Wearing: Heat Gear Armour Tank | Under Armour Speedform Gemini Running Shoes | Printed 6-Pack Headbands | Under Armour Heatgear Alpha Printed Capris
Unleash Your Strength: The Ultimate 10-to-1 Full Body Circuit Workout
Are you ready to redefine your fitness journey and push your physical limits? This exhilarating 10-to-1 full body circuit workout is designed to ignite your metabolism, build functional strength, and leave you feeling accomplished and energized. Whether you’re a seasoned gym-goer or looking to elevate your home workout routine, this challenging circuit combines classic strength exercises with a unique descending rep scheme that promises results. Get ready to sweat, strengthen, and transform your body with an engaging routine that targets every major muscle group.
The 10-to-1 Full Body Workout Explained
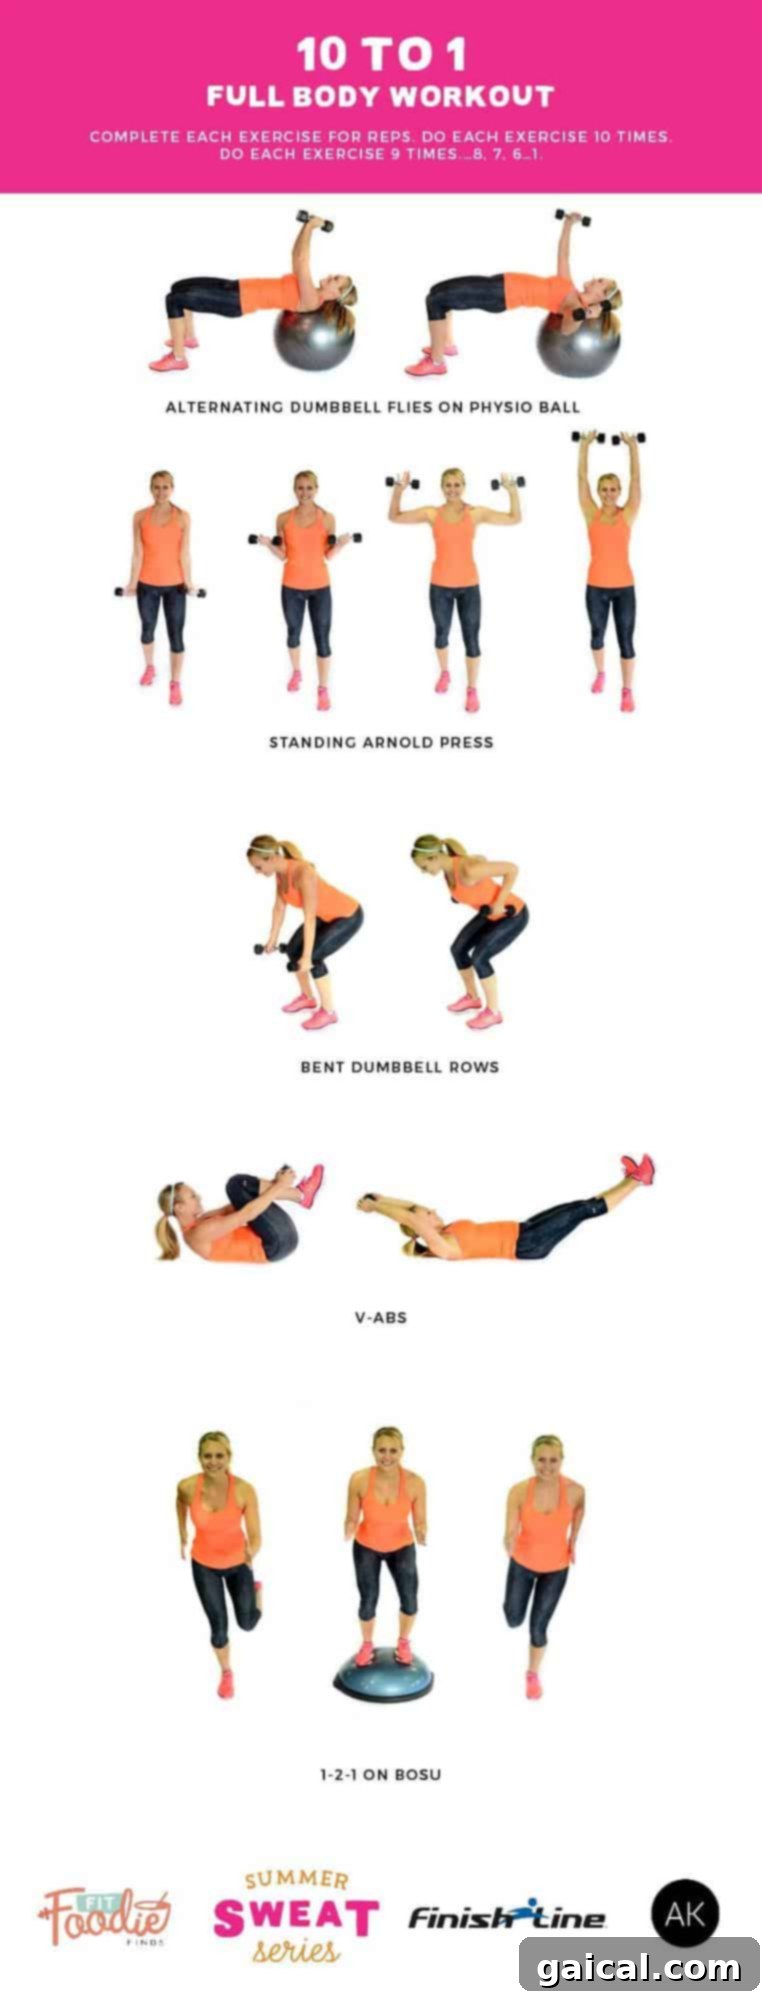
This workout is structured around a “10-to-1” descending rep scheme, meaning you’ll start by performing 10 repetitions of each exercise in the circuit, then move to 9 reps, then 8, and so on, all the way down to a single rep. This method progressively challenges your endurance and mental fortitude, making each round feel different and keeping your muscles guessing. It’s an incredibly efficient way to build both strength and stamina, ensuring a comprehensive workout in a relatively short amount of time.
Equipment Needed: light, medium, and heavy dumbbells, physio ball, Bosu ball
Description: Complete each exercise for reps starting at 10, then 9, 8, and continue descending until you reach 1 repetition for each movement. Rest minimally between exercises and sets to maintain the circuit’s intensity.
Warm-Up: Prepare Your Body for Peak Performance
Before diving into any strenuous activity, a proper warm-up is crucial. It prepares your muscles, increases blood flow, and significantly reduces the risk of injury. Begin with 10 minutes of light cardio: a brisk 1-mile jog on the treadmill, a session on the elliptical, or even dynamic stretches like arm circles, leg swings, torso twists, and jumping jacks. Focus on gradually increasing your heart rate and getting your joints ready for movement. This foundational step will ensure you get the most out of every rep that follows.
Alternating Dumbbell Flies on Physio Ball: Sculpting Your Chest and Shoulders
This exercise not only targets your chest and shoulders but also engages your core for stability, thanks to the unstable surface of the physio ball.
Setup: Position your upper back and neck comfortably on a physio ball, ensuring your head is supported. Your feet should be planted firmly on the ground, hip-width apart, with your hips lifted to create a straight line from your knees to your shoulders. Hold a light to medium dumbbell in each hand, extending both arms straight up towards the ceiling, palms facing each other, with a slight bend in your elbows.
Execution: In an alternating fashion, slowly lower one arm out to the side in a wide arc, maintaining that slight bend in your elbow, until your hand is roughly level with your shoulder. Simultaneously, keep the other arm extended straight up, actively resisting the urge to let it drop. Feel the stretch across your chest as you lower. Control the movement as you bring the dumbbell back up to the starting position. Repeat on the opposite side.
Form Focus: Keep your core tight and hips elevated throughout the movement. Avoid arching your lower back. The movement should come from your chest and shoulders, not your biceps.
Modification: Use lighter weights or perform the exercise on a flat bench for increased stability if the physio ball is too challenging initially.
Standing Arnold Press: Comprehensive Shoulder Development
Named after Arnold Schwarzenegger, this press offers a unique rotational movement that targets all three heads of the deltoid muscle, providing superior shoulder development compared to a traditional overhead press.
Setup: Stand with your feet shoulder-width apart, or in a slight split stance for added balance. Hold a medium-sized dumbbell in each hand, palms facing your body, with your elbows bent and the dumbbells positioned in front of your shoulders (similar to the top of a bicep curl).
Execution: Begin by performing a controlled bicep curl, bringing the dumbbells fully up towards your shoulders. From this position, rotate your wrists outwards so your palms face forward, simultaneously pressing the dumbbells upwards in an arc until your arms are fully extended overhead. Think of moving from a bicep curl to a “goal-post” position, then directly into an overhead press. Reverse the movement by rotating your palms back inwards as you lower the dumbbells to the starting position in front of your shoulders.
Form Focus: Maintain a slight bend in your knees and engage your core to protect your lower back. Control the rotation and avoid swinging the weights.
Modification: Use lighter weights or perform a standard overhead press without the rotation if the Arnold press feels too complex.
Bent Dumbbell Rows: Building a Strong, Resilient Back
The bent dumbbell row is a fundamental exercise for strengthening your entire back, improving posture, and enhancing pulling strength.
Setup: Stand with your feet hip-width apart. Hinge forward at your hips, keeping a slight bend in your knees, until your torso is almost parallel to the floor. Crucially, maintain a long spine from your neck to your tailbone, keeping your back flat and your core engaged. Let your arms hang straight down, holding medium to heavy dumbbells with palms facing each other.
Execution: On the exhale, powerfully pull the dumbbells up towards your chest, squeezing your shoulder blades together. Your elbows should lead the movement and stop around shoulder height, keeping them close to your body. Focus on pulling with your back muscles, not just your arms. Slowly lower the dumbbells back down to the starting position, controlling the eccentric phase of the movement.
Form Focus: Avoid rounding your back. Keep your neck in a neutral position, in line with your spine. Do not use momentum; the movement should be slow and controlled.
Modification: Use lighter weights or perform single-arm rows with one hand supported on a bench for added stability.
V-Abs: Dynamic Core Strength and Stability
This advanced core exercise targets your entire abdominal region, improving both strength and definition. Adding a heavy dumbbell increases the challenge significantly.
Setup: Lie on your back on the floor, holding one heavy dumbbell with both hands. Extend your arms straight back behind your head (just a few inches off the ground) and your legs straight out in front of you (also a few inches off the ground). Create a slight “V” shape with your feet, keeping them together.
Execution: On the exhale, simultaneously pull your knees into your chest while lifting your upper body off the ground. As you crunch up, pull the dumbbell over your knees towards your shins. Your body should form a compact “V” shape. Control the movement as you slowly extend back out to the long, starting position, making sure your arms and legs don’t fully rest on the ground until the set is complete.
Form Focus: Keep your lower back pressed into the mat throughout the exercise. Engage your core fully to initiate the movement, rather than relying on momentum.
Modification: Use a lighter dumbbell or no weight at all. Alternatively, perform basic crunches or knee tucks if the full V-ab is too intense.
1/2/1 on Bosu: Agility, Balance, and Lower Body Power
This dynamic exercise challenges your balance, agility, and single-leg strength, all while engaging your core on the unstable Bosu surface.
Setup: Place a Bosu ball (dome side up) to your right. Start in a low, athletic stance with a slight bend in your knees, standing to the left of the Bosu.
Execution: Leap off your left leg, quickly stepping your right foot onto the Bosu dome, then immediately stepping your left foot onto the Bosu dome. From the Bosu, quickly step your right foot off the Bosu to the right side, landing softly on your right foot in a low, single-leg squat position. Hold this low squat for 2 seconds, focusing on balance and stability. This completes one movement on the right side. Without fully standing, repeat the entire sequence, leaping from your right leg to the Bosu, then stepping off to the left side into a single-leg squat.
Round Completion: One movement on the left side and one movement on the right side equals 1 round. For the 10-to-1 scheme, you’ll perform 10 rounds, then 9 rounds, and so on.
Form Focus: Maintain a low center of gravity throughout. Control your landing on the Bosu and off, engaging your core and glutes to stabilize.
Modification: Perform the movement without the Bosu ball, simply stepping side-to-side into single-leg squats. For an easier version with the Bosu, focus on stepping on and off without the leap, or reduce the hold time in the single-leg squat.
Why This Workout Works: Benefits of the 10-to-1 Circuit
This specific workout structure offers a multitude of benefits that contribute to overall fitness and physical transformation:
- Enhanced Strength and Endurance: The descending rep scheme allows you to lift heavier weights for the initial higher rep counts, building muscle endurance, while the lower reps at the end of the circuit challenge your maximal strength.
- Metabolic Boost: Circuit training with minimal rest between exercises keeps your heart rate elevated throughout the session, turning your strength workout into a potent cardio and fat-burning session.
- Full Body Engagement: By targeting multiple muscle groups across various exercises, you ensure balanced development, preventing muscular imbalances and promoting functional strength that translates to everyday activities.
- Time Efficiency: Full body circuits are incredibly efficient, allowing you to achieve a comprehensive workout in less time compared to traditional split routines.
- Mental Toughness: The progressive decrease in repetitions challenges your mental resilience, teaching you to push through discomfort and stay focused, which is a valuable skill in and out of the gym.
- Variety and Progression: The 10-to-1 format naturally introduces a form of progressive overload and keeps the workout engaging, preventing plateaus and boredom.
Maximizing Your Session: Key Tips for Success
To get the most out of your 10-to-1 full body workout and ensure a safe, effective experience, consider these essential tips:
- Listen to Your Body: This is paramount. If you feel sharp pain, stop immediately. Distinguish between muscle fatigue and actual injury. Modify exercises as needed to match your current fitness level.
- Prioritize Form Over Weight: Always choose proper technique over lifting heavier weights. Incorrect form can lead to injuries and reduce the effectiveness of the exercise. If your form starts to break down, reduce the weight or take a brief pause.
- Stay Hydrated: Drink plenty of water before, during, and after your workout. Proper hydration is critical for muscle function, energy levels, and recovery.
- Control Your Breathing: Focus on a consistent breathing pattern. Typically, exhale during the exertion phase (e.g., as you lift a weight) and inhale during the release phase.
- Mind-Muscle Connection: Actively think about the muscles you are working. This mental focus helps to better engage the target muscles and improves results.
- Fuel Your Body: Support your efforts with a balanced diet rich in lean protein, complex carbohydrates, and healthy fats. Proper nutrition is crucial for muscle repair, growth, and overall energy.
- Consistency is Key: Regularity is more important than intensity. Aim for consistent workouts to see lasting results.
Cool-Down and Recovery: The Final Essential Step
Don’t skip the cool-down! After pushing your body, a proper cool-down helps to gradually bring your heart rate down, improve flexibility, and aid in muscle recovery. Spend 5-10 minutes performing static stretches, holding each stretch for 20-30 seconds. Focus on the muscle groups you just worked, such as chest, shoulders, back, core, and legs. Consider incorporating foam rolling to release muscle tension and improve circulation. Adequate rest and sleep are also vital components of your recovery process.
Disclaimer: Please consult your doctor or a qualified healthcare professional before starting any new fitness regime, especially if you have any pre-existing health conditions or concerns. While the creators of this workout, Lee from Fit Foodie Finds and Monique from Ambitious Kitchen, consulted with professional trainers for the Summer SWEAT Series fitness program, you are participating at your own risk. It is imperative to listen to your body, modify exercises as needed, and prioritize your safety. If you experience any pain or discomfort, cease the exercise immediately. Your well-being is the utmost priority.
This post is proudly sponsored by Finish Line as part of the exciting Summer SWEAT Series. We extend our sincere gratitude for their support in making this content possible. Please know that I was compensated for my time and effort in creating this workout, but all opinions expressed here are genuinely my own and reflect my honest experience and recommendations. Thank you for continuing to support Fit Foodie Finds and our mission to inspire a healthier, more active lifestyle!