
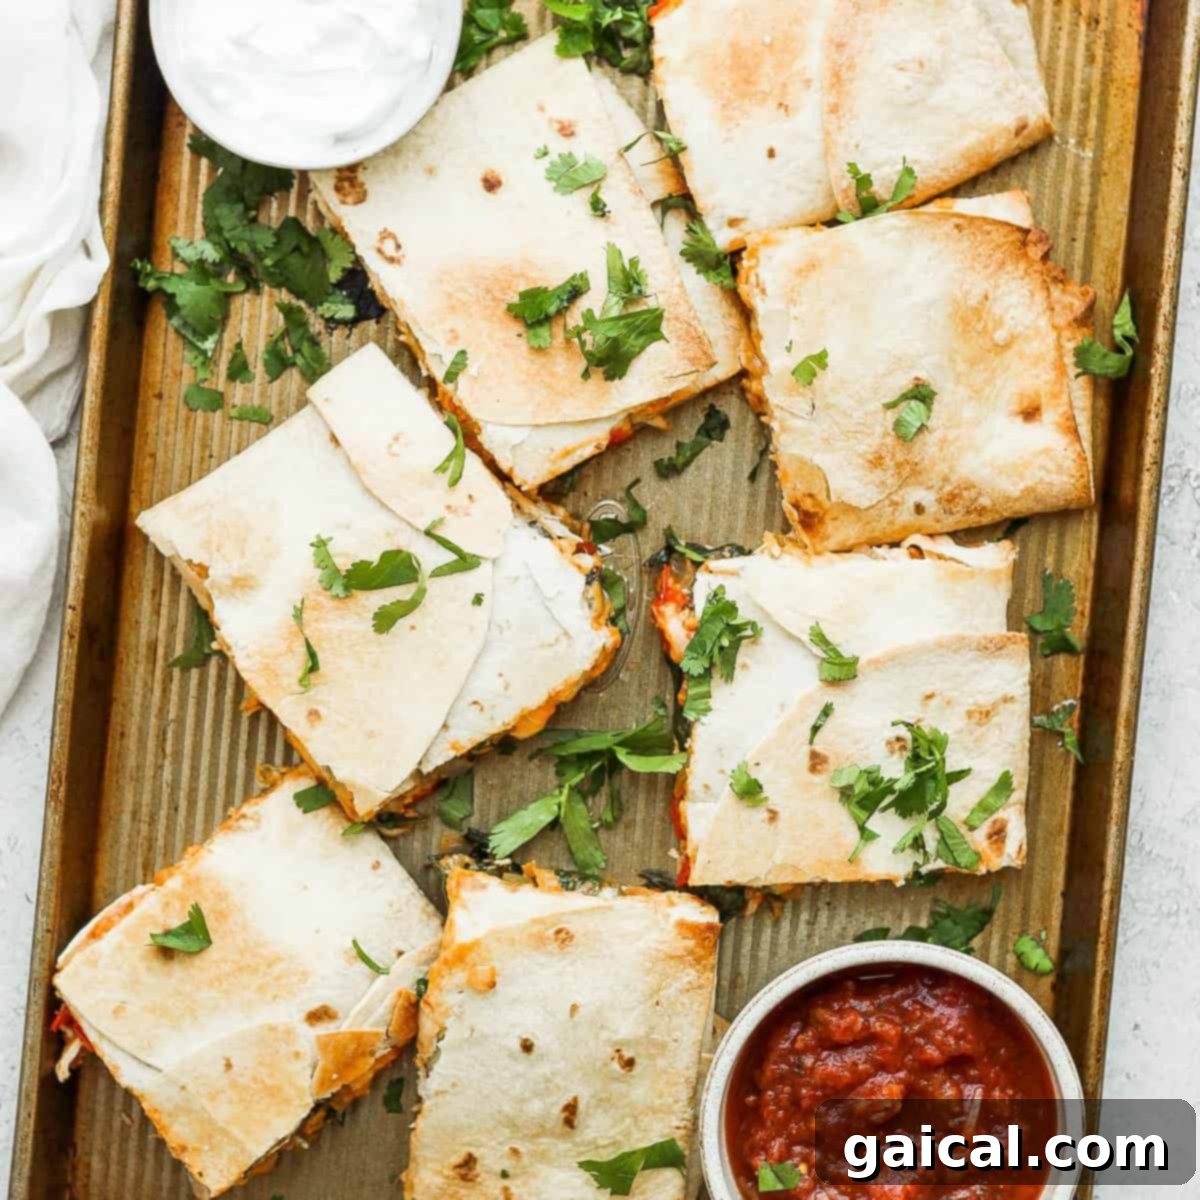
Forget the mess and endless flipping of individual quesadillas! Our incredible **Sheet Pan Quesadilla** recipe is a game-changer for busy weeknights, effortless entertaining, and smart meal prep. Imagine perfectly golden-brown, crispy tortillas generously stuffed with savory shredded salsa chicken, vibrant vegetables, and gooey melted cheese – all baked to perfection on a single baking sheet. This brilliant method yields a delicious batch of nine satisfying quesadillas with minimal fuss, transforming your kitchen experience into a breeze.
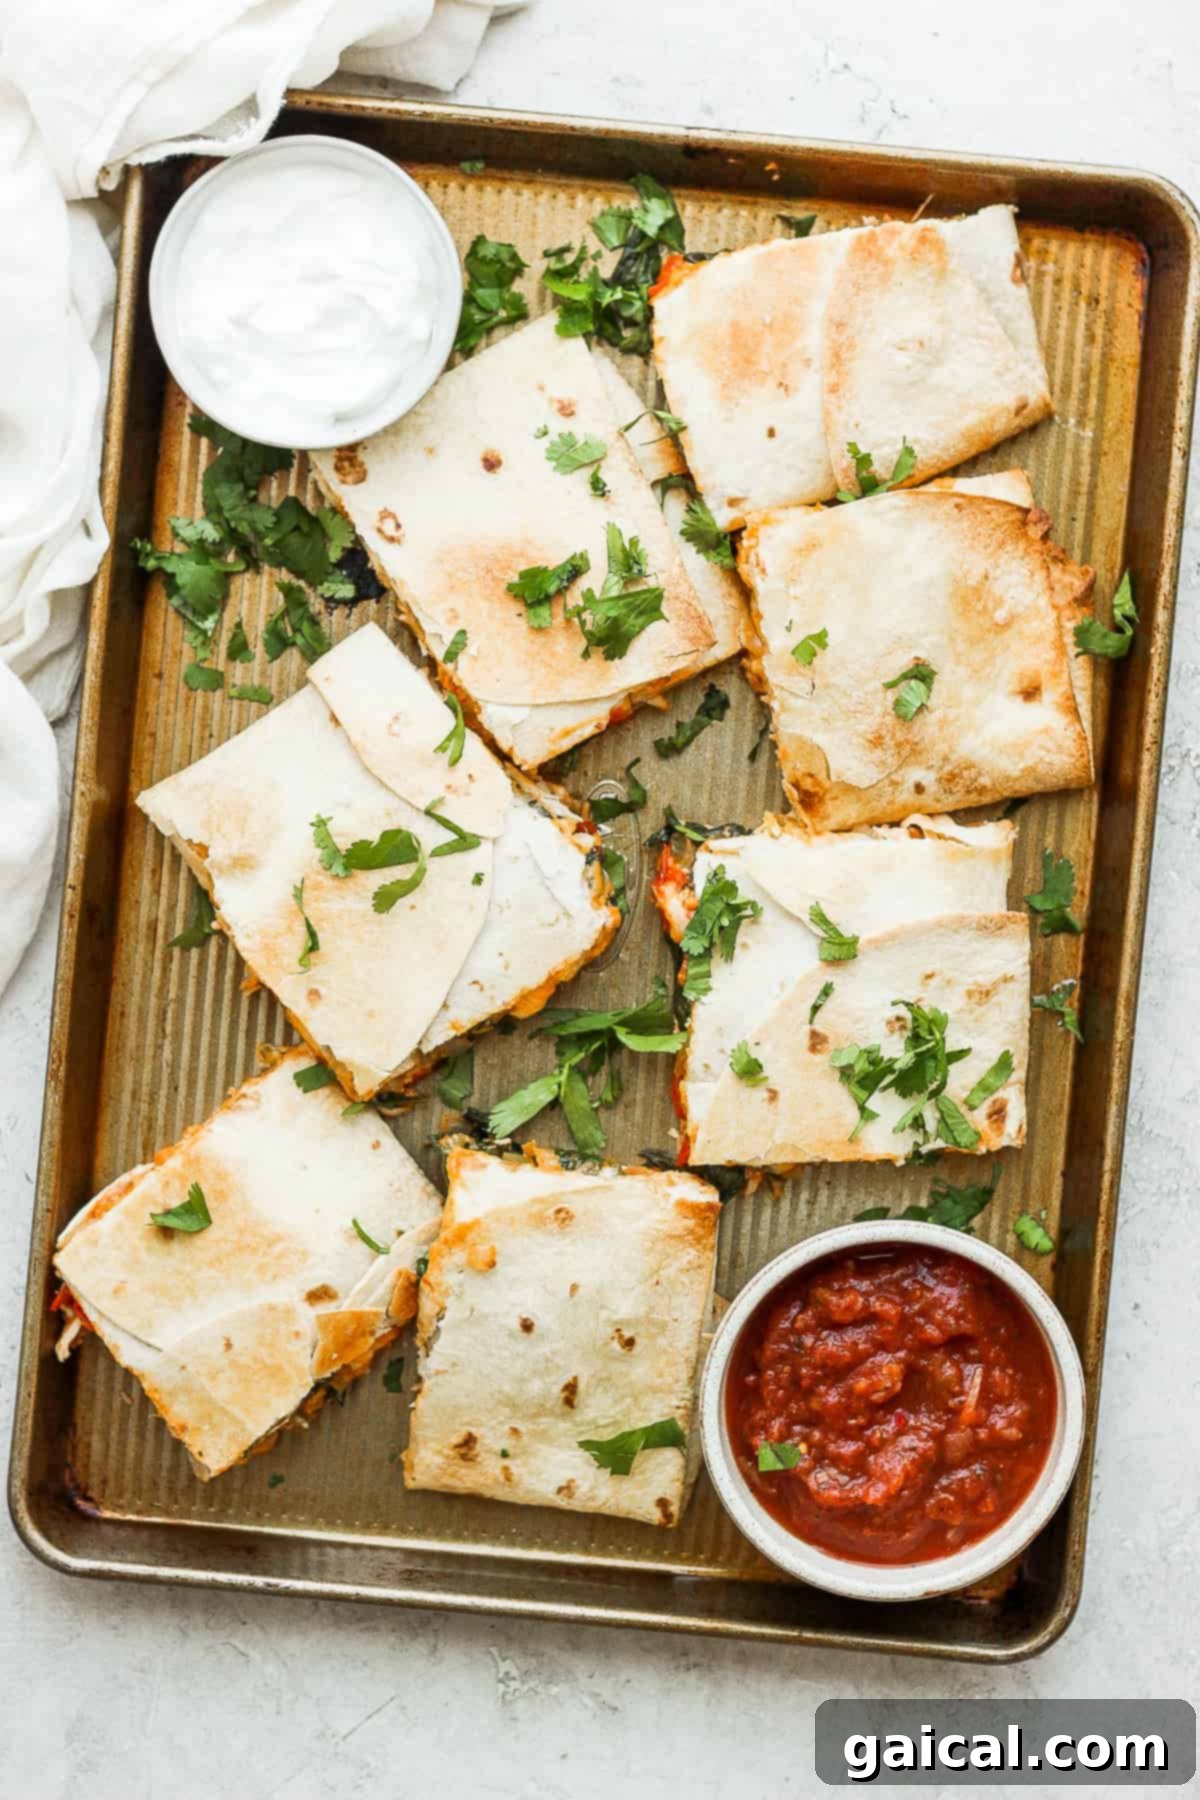
Amazing Sheet Pan Quesadillas: Crispy, Cheesy, and So Easy!
Are you tired of standing over a hot stove, flipping individual quesadillas one by one? Our sheet pan quesadilla recipe is here to save your weeknights! This ingenious approach allows you to bake a large batch of delicious, golden-brown, and crispy quesadillas all at once in the oven. Not only does it significantly reduce cooking time and cleanup, but it also consistently delivers perfectly fused, flavorful quesadillas that are sure to be a hit with everyone. This recipe is celebrated for its incredible ease, robust flavor, and satisfying deliciousness – making it a staple for any home cook looking for a stress-free meal.
Essential Tips Before You Start
To ensure your sheet pan quesadillas turn out perfectly crispy and delicious, here are a few expert tips to keep in mind before you begin:
- **Choosing the Right Tortillas:** Whether you opt for 10-inch or 12-inch fresh flour tortillas, ensure they are pliable and not prone to cracking. Larger tortillas will require fewer overlaps, which can simplify assembly slightly. If you’re using gluten-free tortillas, a quick warm-up in the microwave or a dry skillet can dramatically increase their flexibility and prevent them from tearing during the folding process.
- **Salsa Infusion for Flavor:** The secret to deeply flavorful chicken lies in pre-mixing it thoroughly with salsa. Allow this mixture to sit for at least 10-15 minutes (or even longer, refrigerated, for advanced meal prep) before you start building your quesadilla. This crucial absorption process ensures that every bite of shredded chicken is bursting with zesty salsa flavor, making your quesadillas exceptionally tasty.
- **The Critical Baking Sheet Press:** Do not skip this vital step! Placing a second baking sheet directly on top of your assembled quesadilla before baking creates a gentle, even press. This pressure is essential for several reasons: it ensures the tortillas adhere firmly together, prevents the edges from curling up, and promotes uniform browning and crispiness across the entire surface, resulting in a cohesive, perfect quesadilla that won’t fall apart when sliced.
Key Ingredients for Perfect Sheet Pan Quesadillas
Every great recipe starts with quality ingredients. Here’s what you’ll need to create your magnificent sheet pan quesadillas, along with some insights into why each component is essential:
- Fresh Flour Tortillas: These are the foundation of your quesadilla. Flour tortillas are preferred for their flexibility and how beautifully they crisp up in the oven. While 12-inch tortillas can reduce the number of seams and make assembly a bit quicker, 10-inch tortillas work just as effectively – you’ll simply need to use a few more to adequately cover your sheet pan. Always opt for the freshest tortillas available for the best folding and texture.
- Tender Shredded Chicken: The delicious protein core of our quesadilla! A pre-cooked rotisserie chicken is an absolute time-saver, providing tender, juicy shredded chicken instantly. Alternatively, you can easily prepare your own shredded chicken from scratch using chicken breasts or thighs. We have excellent, tried-and-true recipes for baked shredded chicken, Instant Pot shredded chicken, or Crockpot shredded chicken, offering methods to suit any schedule.
- Flavorful Salsa: The salsa provides essential moisture, seasoning, and a vibrant flavor kick to the chicken. We highly recommend using a chunky salsa for added texture and a more robust flavor profile. While a mild salsa offers universal appeal, feel free to use your favorite heat level to customize the spice factor. Just be cautious of overly watery salsas, as excess liquid can lead to soggy tortillas – drain if necessary!
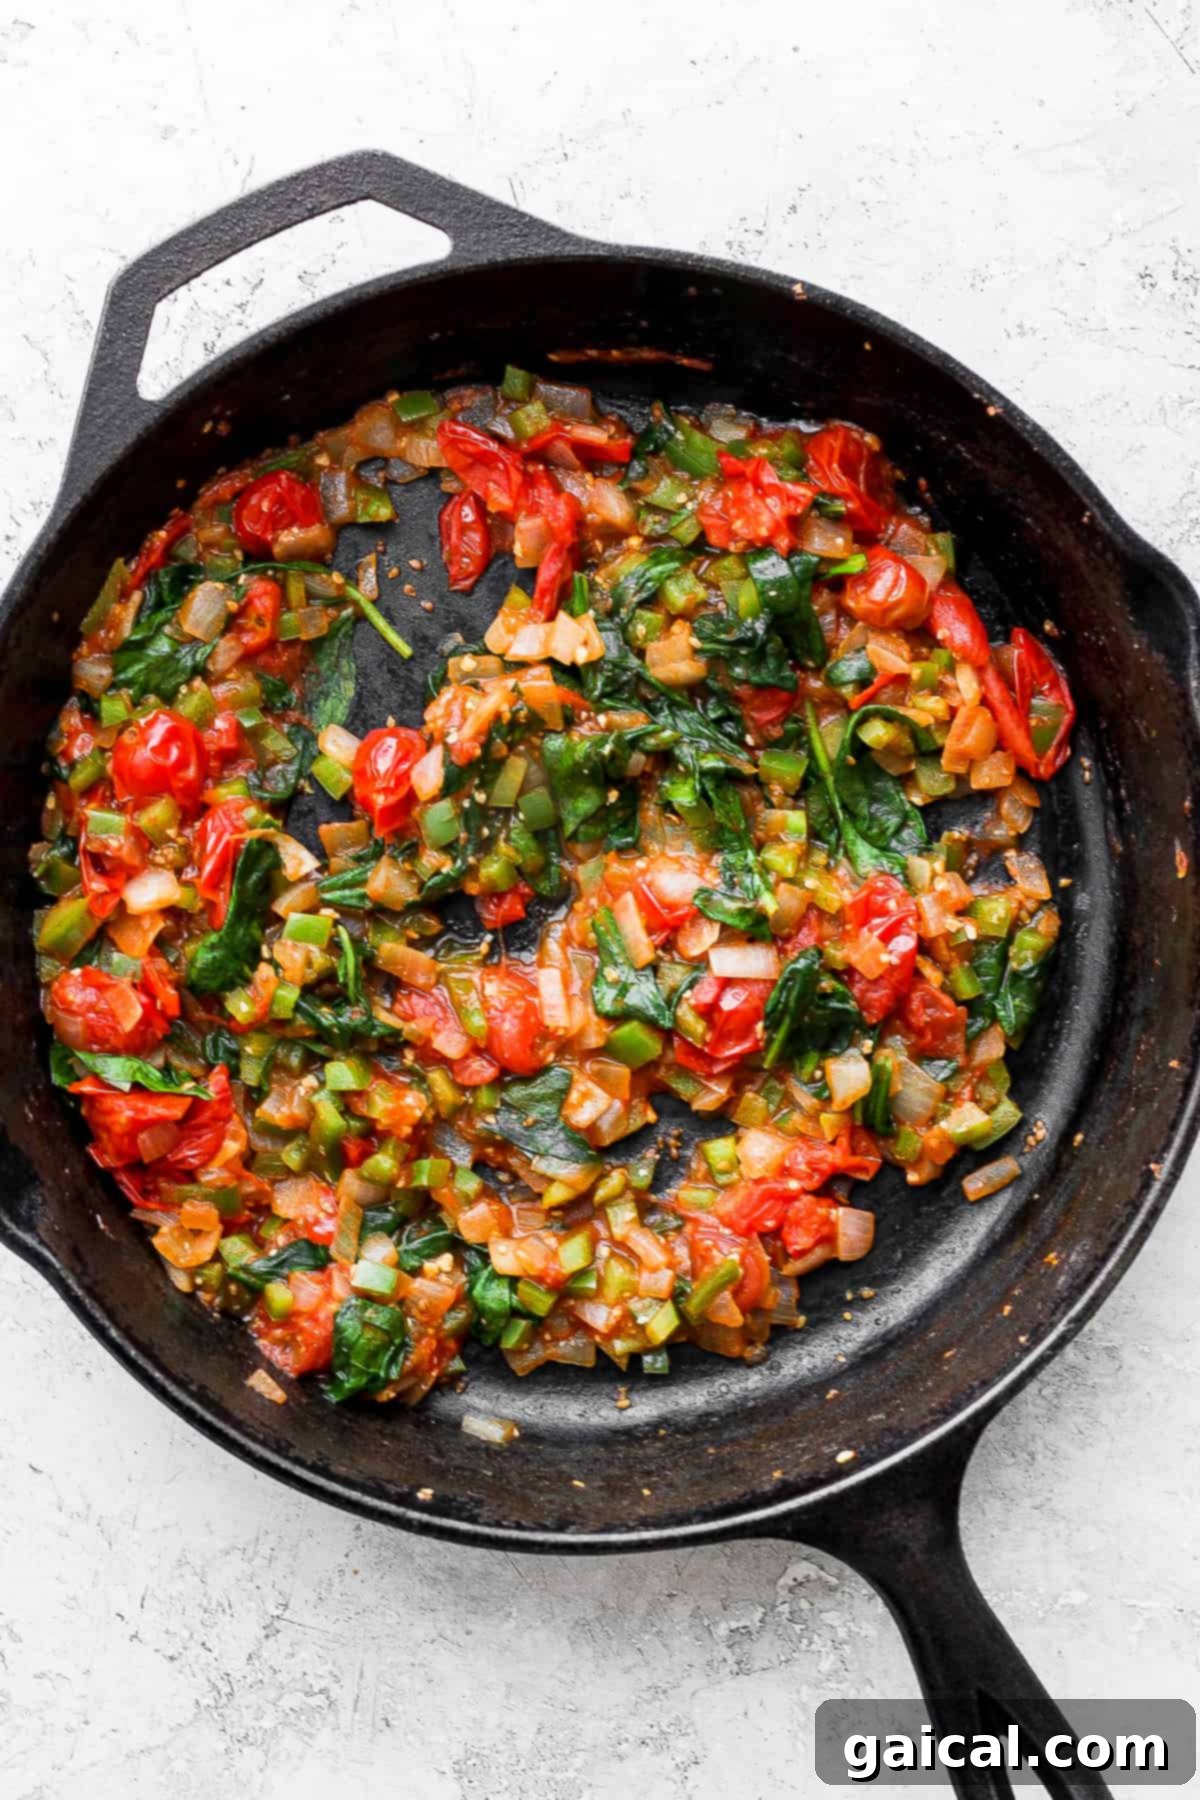
- Colorful Vegetables: Our chosen medley of cherry tomatoes, bell peppers, and spinach not only adds a burst of freshness and essential nutrients but also contributes delightful texture. The key here is to sauté them thoroughly beforehand. This step not only softens them and concentrates their flavors but, most importantly, reduces any excess moisture that could make your tortillas soggy. Allow the cherry tomatoes to ‘stew’ slightly as they cook, releasing their juices and creating a richer, more integrated flavor.
- Melted Mexican-Style Shredded Cheese: A generous amount of cheese is non-negotiable for any quesadilla! A good Mexican-style shredded cheese blend is perfect, known for its excellent meltability and savory flavor. Monterey Jack, cheddar, or a blend of both are fantastic choices. For those who enjoy a little heat, pepper jack cheese makes a wonderful addition, or for a milder, creamier touch, consider queso fresco.
Creative Ingredient Swaps & Variations
This recipe is incredibly versatile! Feel free to customize it based on your preferences or what you have on hand:
- **Tortilla Alternatives:** While flour tortillas are traditional, gluten-free flour tortillas can be easily substituted for dietary needs. Remember to gently warm them before folding to prevent cracking.
- **Protein Power-Ups:** Beyond shredded chicken, this recipe shines with other proteins. Try it with savory carnitas, seasoned ground beef or turkey, or even a hearty vegetarian sofritas mix for a plant-based option. Shredded pork, seasoned black beans, or even grilled shrimp can also make fantastic fillings.
- **Vegetable Medley:** Don’t limit yourself to our suggestions! Sautéed mushrooms, corn kernels, diced zucchini, roasted sweet potato cubes, or even finely chopped kale can add wonderful flavors and textures.
- **Cheese Choices:** Experiment with different cheeses like sharp cheddar, creamy Monterey Jack, spicy pepper jack, or a blend of your favorite meltable cheeses.
Step-by-Step Instructions for Your Sheet Pan Quesadillas
1. Prepare the Flavorful Chicken
In a medium-sized bowl, combine your shredded chicken (whether rotisserie or homemade) with your chosen salsa. Stir thoroughly until the chicken is well-coated. Allow this mixture to rest for at least 10-15 minutes while you prepare the vegetables. This short marination period is essential as it gives the chicken time to absorb the salsa’s robust flavors, intensifying the overall taste of your quesadillas.
2. Cook the Vibrant Vegetables
Heat 2 tablespoons of olive oil in a large skillet over medium-high heat. Once the oil is shimmering and fragrant, add the minced white onion and sprinkle with ¼ teaspoon of salt. Sauté the onions for 3-4 minutes until they become translucent and slightly softened. Next, stir in the 4 cloves of minced garlic and 1 cup of halved cherry tomatoes, along with 2 teaspoons of taco seasoning. Continue to cook for 6-8 minutes, gently pressing on the tomatoes to help them burst and soften, releasing their flavorful juices. Finally, add the 1 large minced bell pepper and 2 cups of fresh spinach, packed. Toss them into the other vegetables and cook for an additional 3-4 minutes, or until the spinach has completely wilted and any excess liquid in the pan has evaporated. Removing as much moisture as possible from the vegetables is crucial for preventing soggy tortillas.
3. Expertly Build Your Sheet Pan Quesadilla
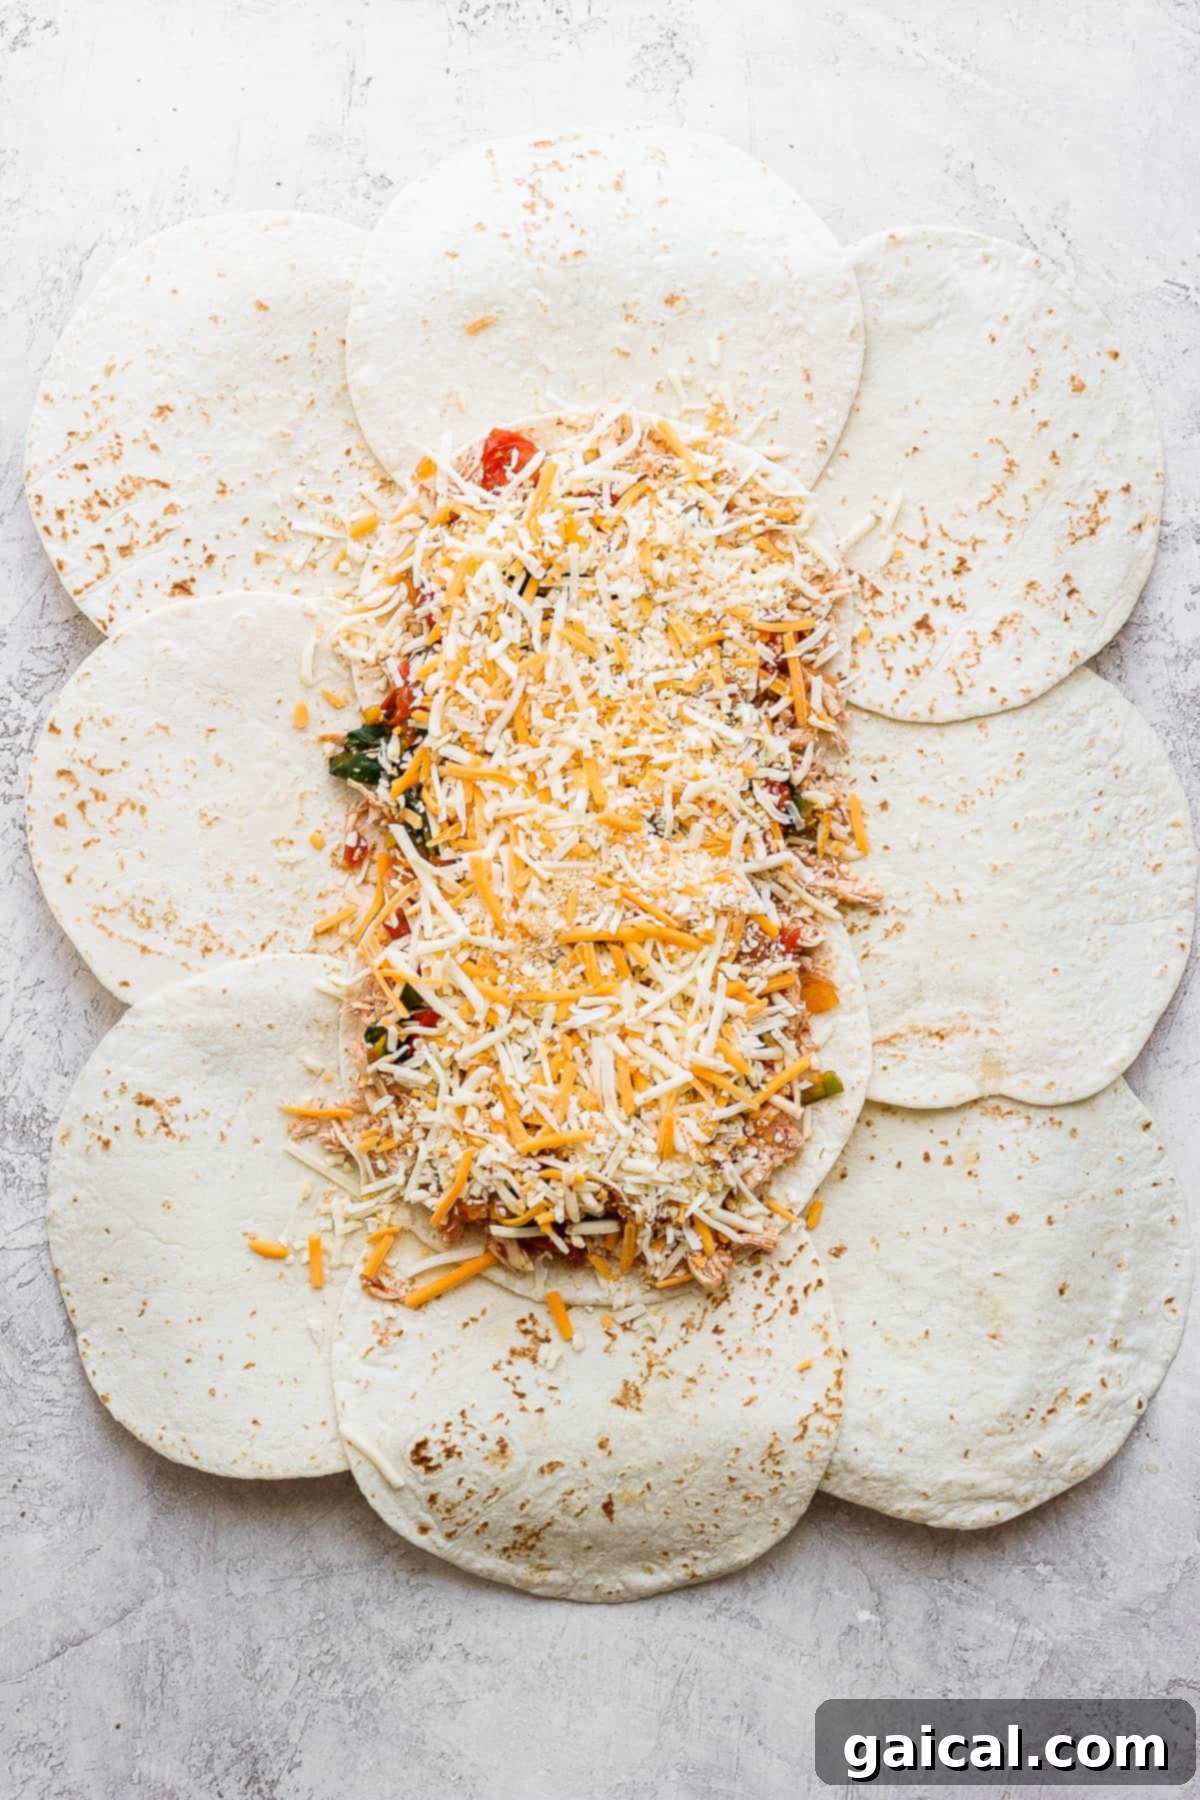
Preheat your oven to 425°F (220°C). Place a wire rack inside a large, rimmed baking sheet and lightly spray the rack with nonstick cooking spray. This setup is key for achieving a crispy bottom crust. Now, arrange your 12 flour tortillas on the wire rack to form your quesadilla base: start by placing two tortillas flat in the center of the rack. Then, lay three tortillas along each of the longer outer edges, overlapping them slightly over the center tortillas. Finish by adding two more tortillas to the two shorter outer edges, ensuring the entire cooling rack is covered by the overlapping tortillas, creating a large, flexible foundation for your filling.
Evenly spread the salsa-infused shredded chicken over the central area of the tortilla base, leaving about an inch clear around the perimeter – this space is needed for folding. Before adding, ensure you drain any excess liquid from the chicken and salsa mixture to prevent sogginess. Layer the sautéed vegetables evenly over the chicken, followed by a generous sprinkle of 1.5 cups of Mexican-style shredded cheese.
To enclose the delicious filling, place the last two flour tortillas on top of the cheese layer in the very middle of the quesadilla. Then, carefully begin to fold the overlapping edges of the bottom tortillas inwards over the filling, creating a securely sealed pocket. Take your time with this step to ensure all the ingredients are snugly tucked inside. Once folded, gently place a second, clean baking sheet directly on top of the entire folded quesadilla. This creates a gentle weighted press, which is crucial for preventing the tortillas from curling during baking and ensuring they stick together for a perfectly cohesive, easy-to-slice quesadilla.
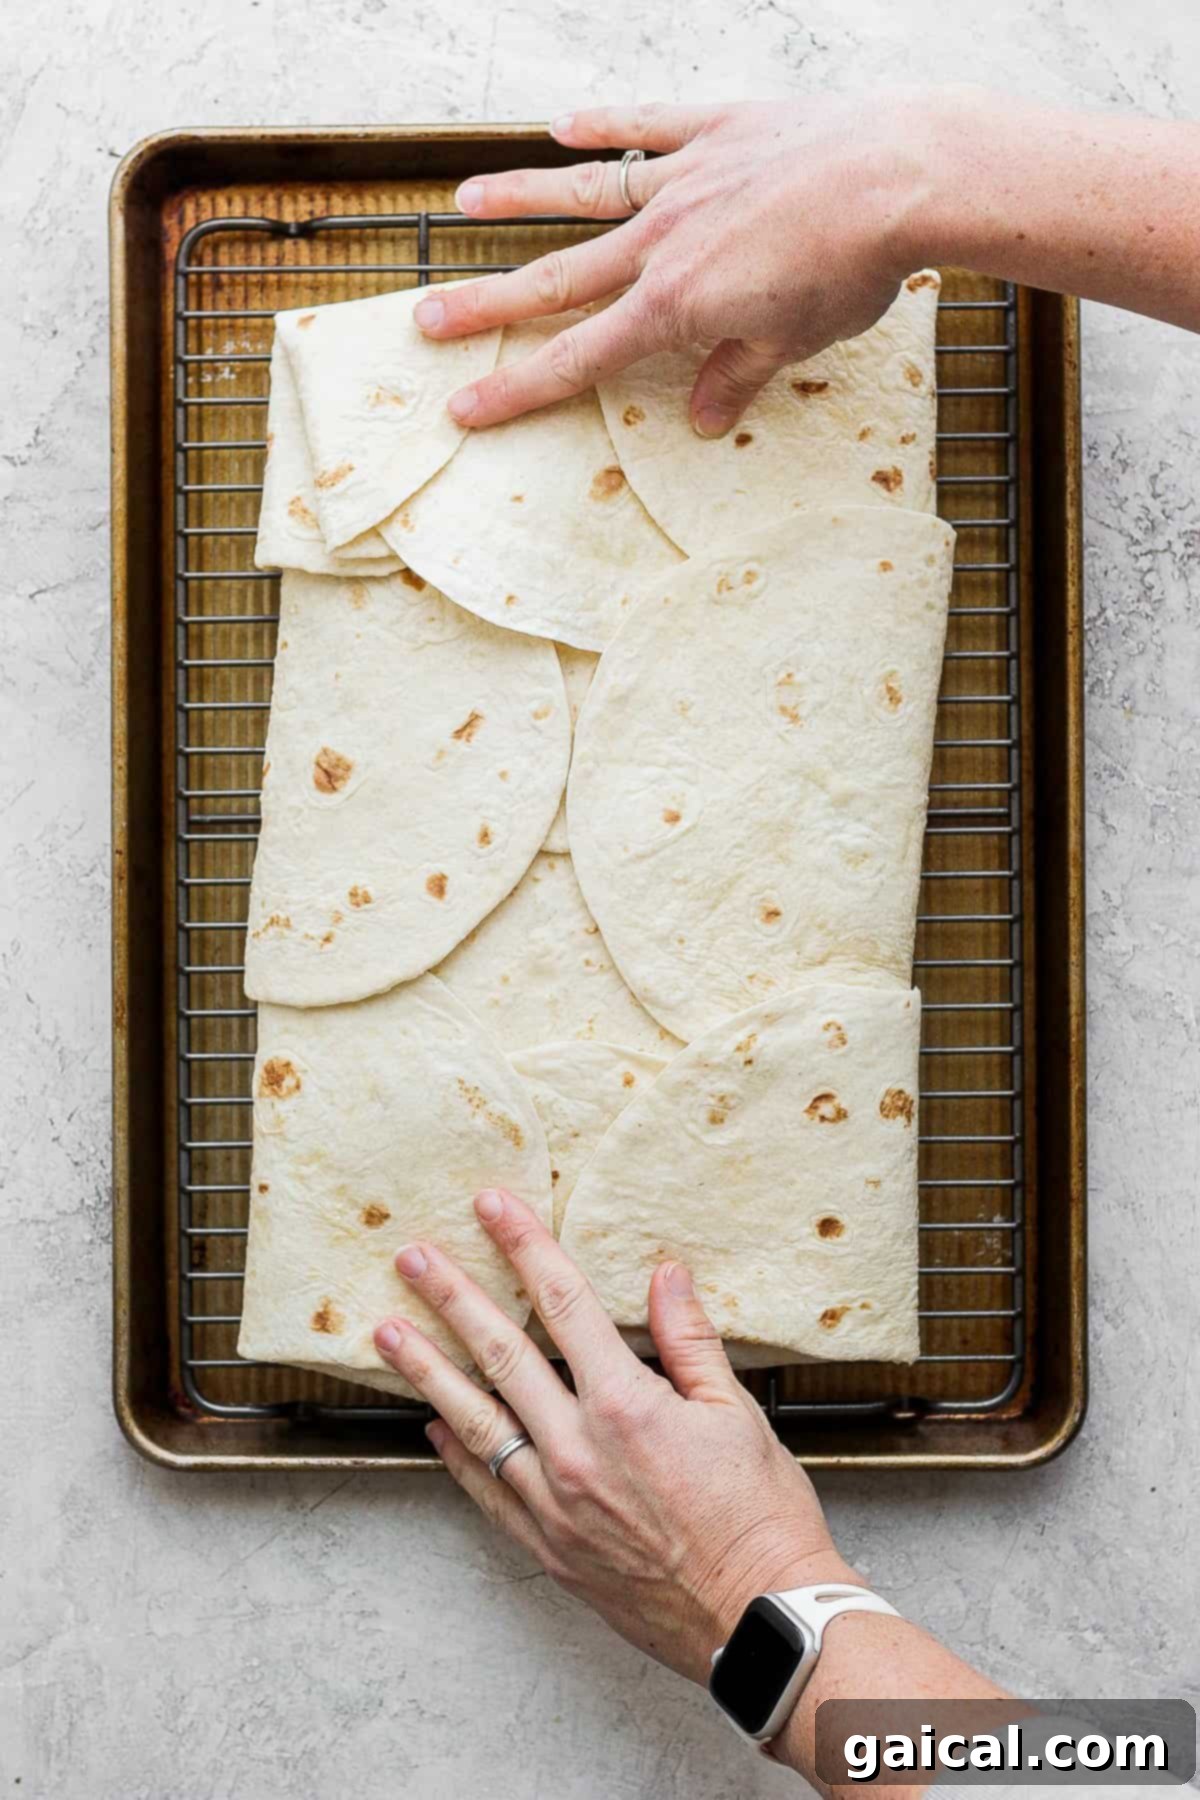
4. Bake to Golden Perfection
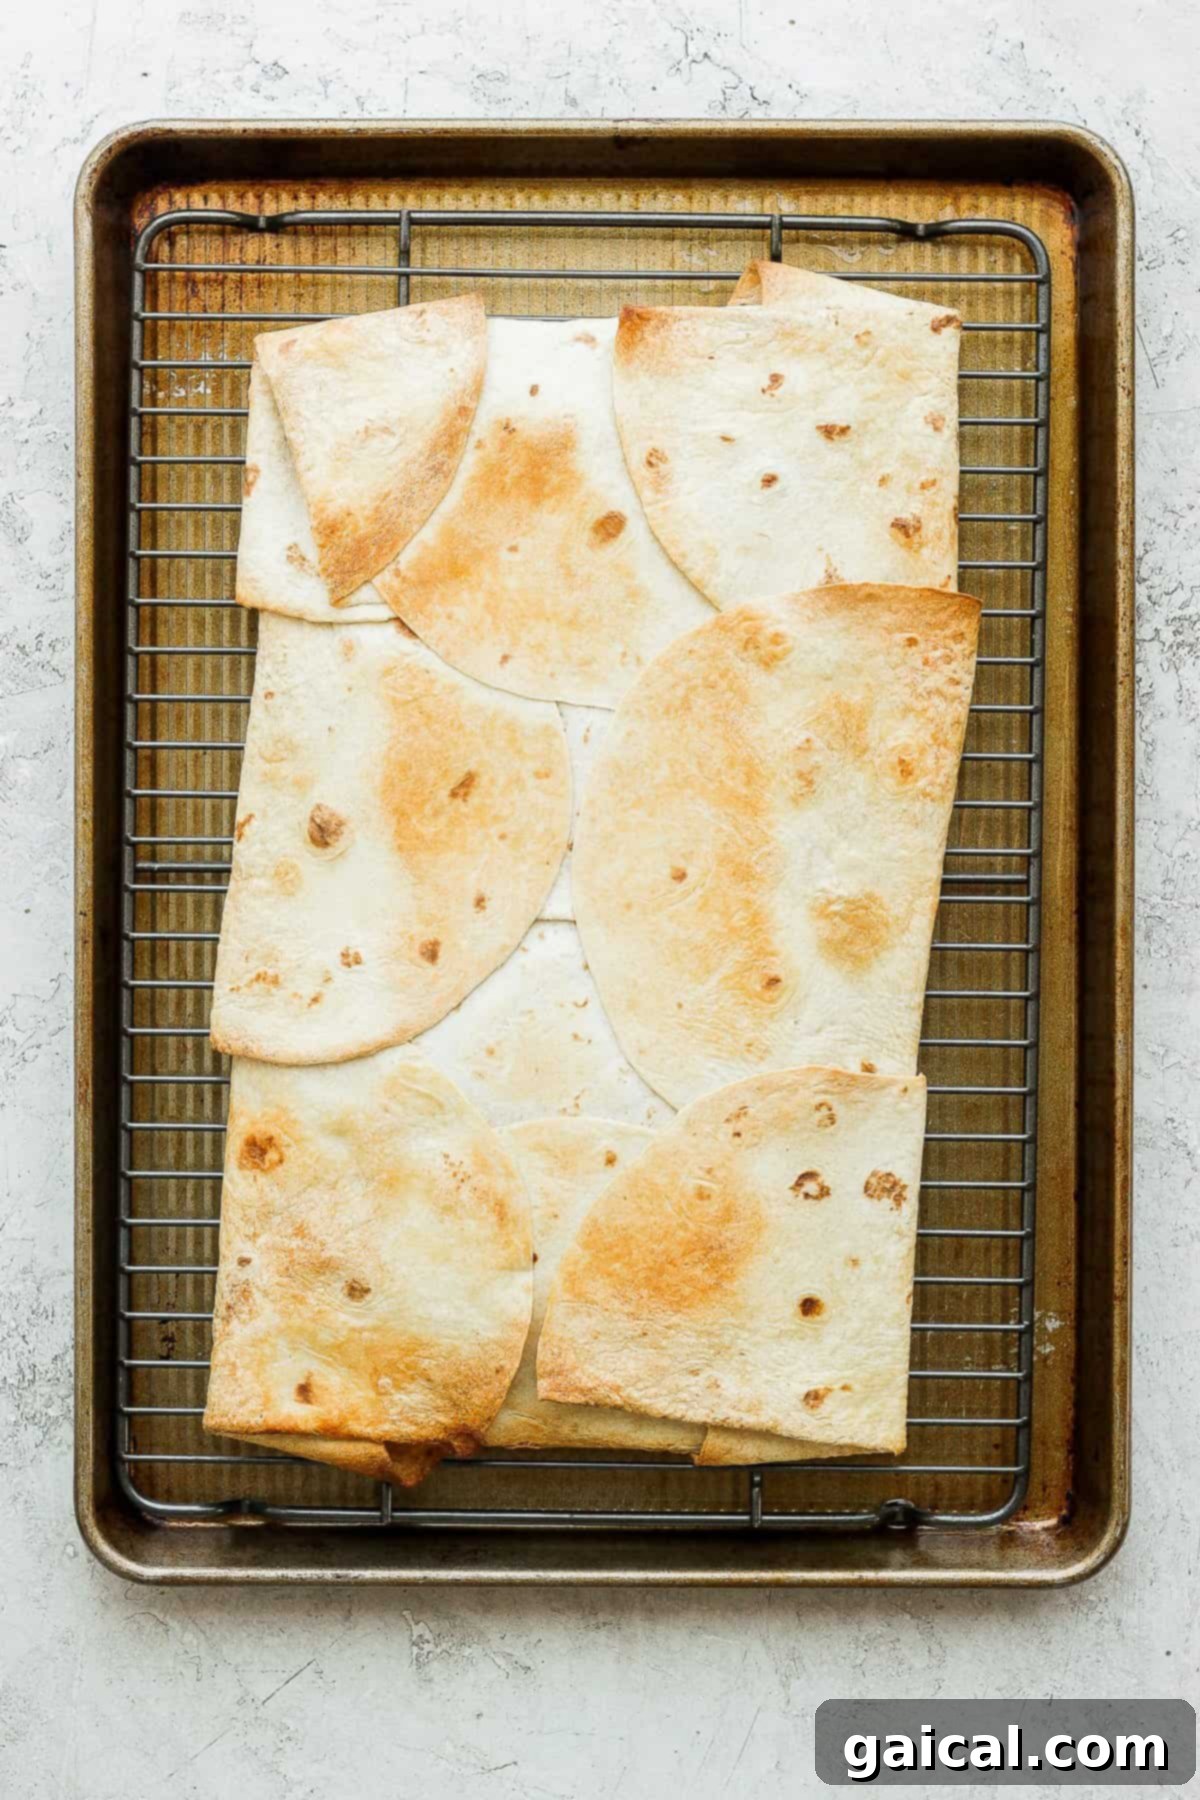
Bake the quesadilla, with the second baking sheet still on top, for 20 minutes at 425°F (220°C). This initial bake allows the quesadilla to set, the cheese to begin melting, and the tortillas to start crisping without the edges curling. After 20 minutes, carefully remove the top baking sheet. Lightly drizzle the top of the quesadilla with a little olive oil or spray it evenly with cooking spray. This step enhances crispiness and helps achieve that beautiful golden-brown finish. Return the quesadilla to the oven and bake for an additional 8-10 minutes, or until the top is gloriously golden brown and irresistibly crispy.
5. Rest and Slice
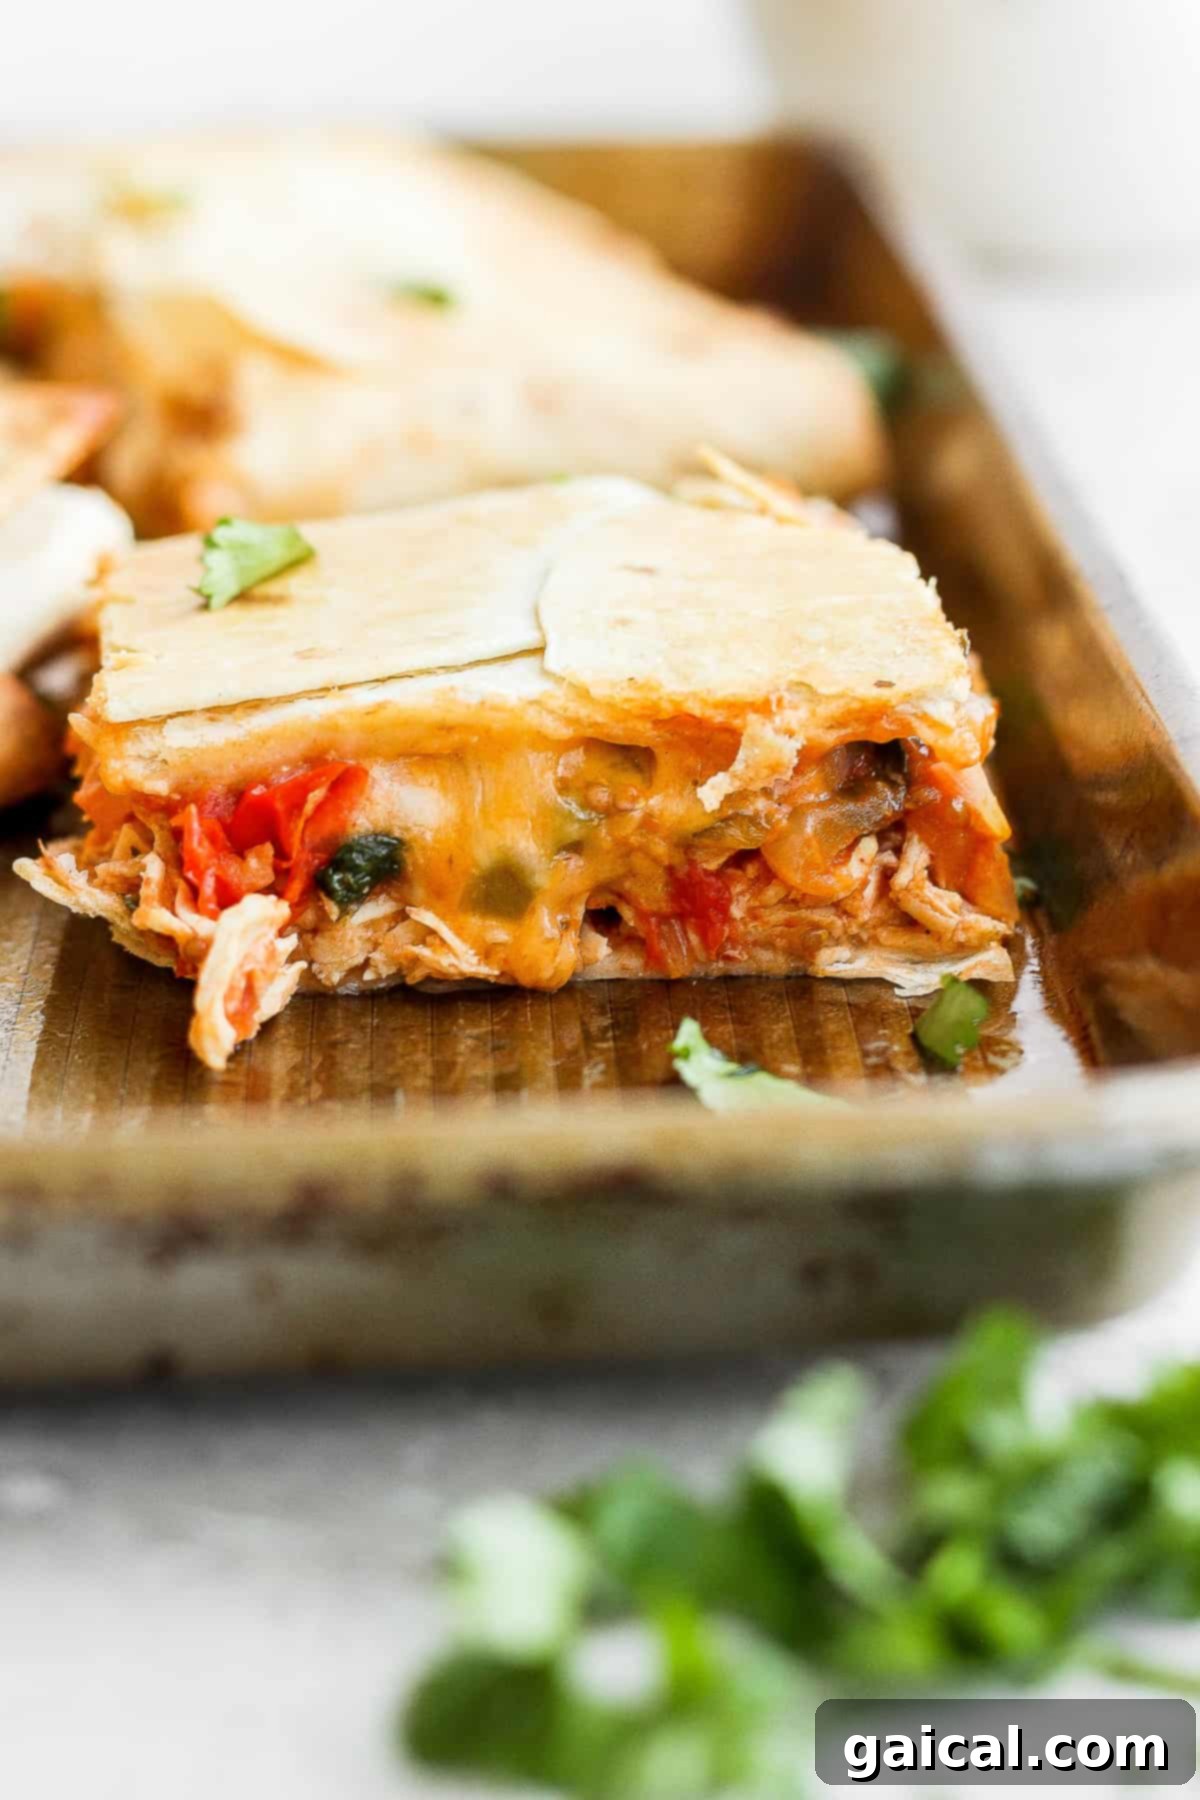
Once baked, remove the quesadilla from the oven and allow it to rest on the wire rack for 5-10 minutes. This crucial resting period is vital as it allows the melted cheese to firm up slightly and the quesadilla to become more stable, making it much easier to slice without the delicious filling spilling out. After resting, carefully transfer the entire quesadilla to a large cutting board. Use a large, sharp knife or a pizza cutter to slice the giant quesadilla into 9 equal squares for perfect, individual servings. Get ready to enjoy your culinary masterpiece!
More Delicious Sandwiches & Burrito Recipes
- Smash Burger Tacos (Japanese BBQ Style)
- Chicken Caesar Salad Spread
- Italian Grinder Sliders
- Grilled Cheese and Tomato Soup
- High-Protein Cottage Cheese Wraps
Expert Tips for Quesadilla Perfection
Achieving the perfect crispy, non-soggy sheet pan quesadilla is simple with these additional pro tips:
- **Always Use a Metal Rack for Baking:** This rule is absolutely paramount! Baking your quesadilla on a wire rack set inside a baking sheet ensures even air circulation around the entire quesadilla. This prevents the bottom from becoming steamed and soggy, guaranteeing a delightfully crispy crust all around.
- **Choose Your Salsa Wisely:** The consistency of your salsa matters more than you might think. Opt for a thicker, chunkier salsa rather than one that is very liquidy. Excess moisture from a thin salsa can seep into the tortillas, leading to a less-than-ideal texture. If your favorite salsa is a bit thin, simply drain off some of the liquid before mixing it with the chicken.
- **Wrap It Up Tight:** A key to a successful sheet pan quesadilla is creating a secure package. Ensure that the overlapping tortillas form a tight seal around all the delicious innards. Don’t be shy about pressing the edges down firmly. Sometimes, an extra pair of hands can be invaluable to help hold the edges in place while you fold, ensuring none of your precious filling escapes during baking.
- **Don’t Forget the Top Baking Sheet:** As mentioned, this simple yet effective trick is vital. The weight of the second baking sheet on top acts as a press, preventing the top tortillas from curling and ensuring they meld seamlessly with the filling and bottom tortillas. This creates a beautifully cohesive and easy-to-slice quesadilla every time.
Storage & Reheating Instructions
Proper storage and reheating ensure your delicious sheet pan quesadillas remain enjoyable for days:
- **Storage:** Once cooled completely, store leftover quesadilla squares in an airtight container. To help prevent the tortillas from becoming soggy, line the bottom of the container with a paper towel before placing the quesadillas inside. The paper towel will absorb any residual moisture. Seal the container and store it in the refrigerator for up to 3-5 days.
- **Reheating:** For the best results and to regain that delightful crispiness, place the quesadilla squares back on a wire rack set into a baking sheet. Reheat them in a preheated oven or toaster oven at 350°F (175°C) for 5-10 minutes, or until they are warmed through and the tortillas are crispy again. While you can microwave them for speed, this method will result in a softer texture.
Sheet Pan Quesadillas Recipe
This amazing sheet pan quesadilla recipe is packed with delicious veggies and salsa chicken. We bake the quesadilla until it becomes golden brown and crunchy, delivering a fantastic meal with minimal effort.
By: Linley Hanson
Prep Time: 20 mins
Cook Time: 30 mins
Total Time: 50 mins
Servings: 6
Ingredients
- 1.5 lbs. shredded chicken, (~4 cups)
- ½-¾ cup of your favorite salsa, (we used a chunky salsa that wasn’t too liquidy)
- 2 tablespoons olive oil
- 1 large white onion, minced
- ¼ teaspoon salt
- 4 cloves garlic, peeled and minced
- 1 cup cherry tomatoes, halved
- 2 teaspoons taco seasoning
- 1 large bell pepper, minced
- 2 cups fresh spinach, packed
- 1.5 cups Mexican-style shredded cheese
- 12, 10-inch flour tortillas
Optional Toppings
- Guacamole
- Sour cream
- Chopped fresh cilantro
Instructions
- Preheat the oven to 425ºF (220°C). Set a wire rack into a rimmed baking sheet and then spray with nonstick cooking spray. Set aside.
- Prepare the chicken first, by mixing the shredded chicken and salsa together in a bowl and tossing. Set aside so the chicken absorbs as much salsa as possible. The type of salsa you use dictates how spicy your quesadilla is.
- Heat a large skillet over medium-high heat. Add olive oil. When the olive oil is fragrant, add the onion to the pan and sprinkle with salt. Sauté the onions for 3-4 minutes until translucent.
- Add the garlic and cherry tomatoes to the onion and sprinkle with taco seasoning. Cook the tomatoes down for 6-8 minutes or until the tomatoes have burst and started to soften.
- Next, add the bell pepper and spinach to the pan and toss them into the other vegetables. Cook for an additional 3-4 minutes or until the spinach is wilted and there isn’t a ton of excess liquid in the pan. Remove from heat and set aside.
- Line the wire rack with tortillas. Add 2 tortillas flat in the middle of the rack. Then, line the longer outside edges with 3 tortillas, ensuring they overlap slightly. Add 2 more tortillas to the two shorter edges so that the cooling rack is completely covered, forming your base.
- Spread the shredded chicken evenly over the middle of the tortillas, but not completely to the edges of the tortillas, as you will be folding the edges over the quesadilla filling.
- Spread the cooked vegetables evenly over the chicken and then sprinkle the shredded cheese generously over the vegetables.
- Place the last 2 flour tortillas in the middle of the quesadilla filling and then carefully fold the edges of the bottom tortillas up over the filling. Be sure the tortillas are overlapping securely so that the filling is sealed.
- Place an additional baking sheet on top of the sheet pan quesadillas. This pressing action ensures the edges don’t curl and helps the quesadilla stick together. Bake the quesadillas at 425ºF (220°C) for 20 minutes.
- Remove the top baking sheet and lightly drizzle the top of the quesadilla with olive oil or spray with cooking spray.
- Bake for an additional 8-10 minutes, or until the quesadilla is beautifully golden brown and crispy.
- Remove the quesadilla from the oven and let it sit for 5-10 minutes before transferring it to a large cutting board.
- Use a large knife or a pizza cutter to cut the quesadillas into 9 squares.
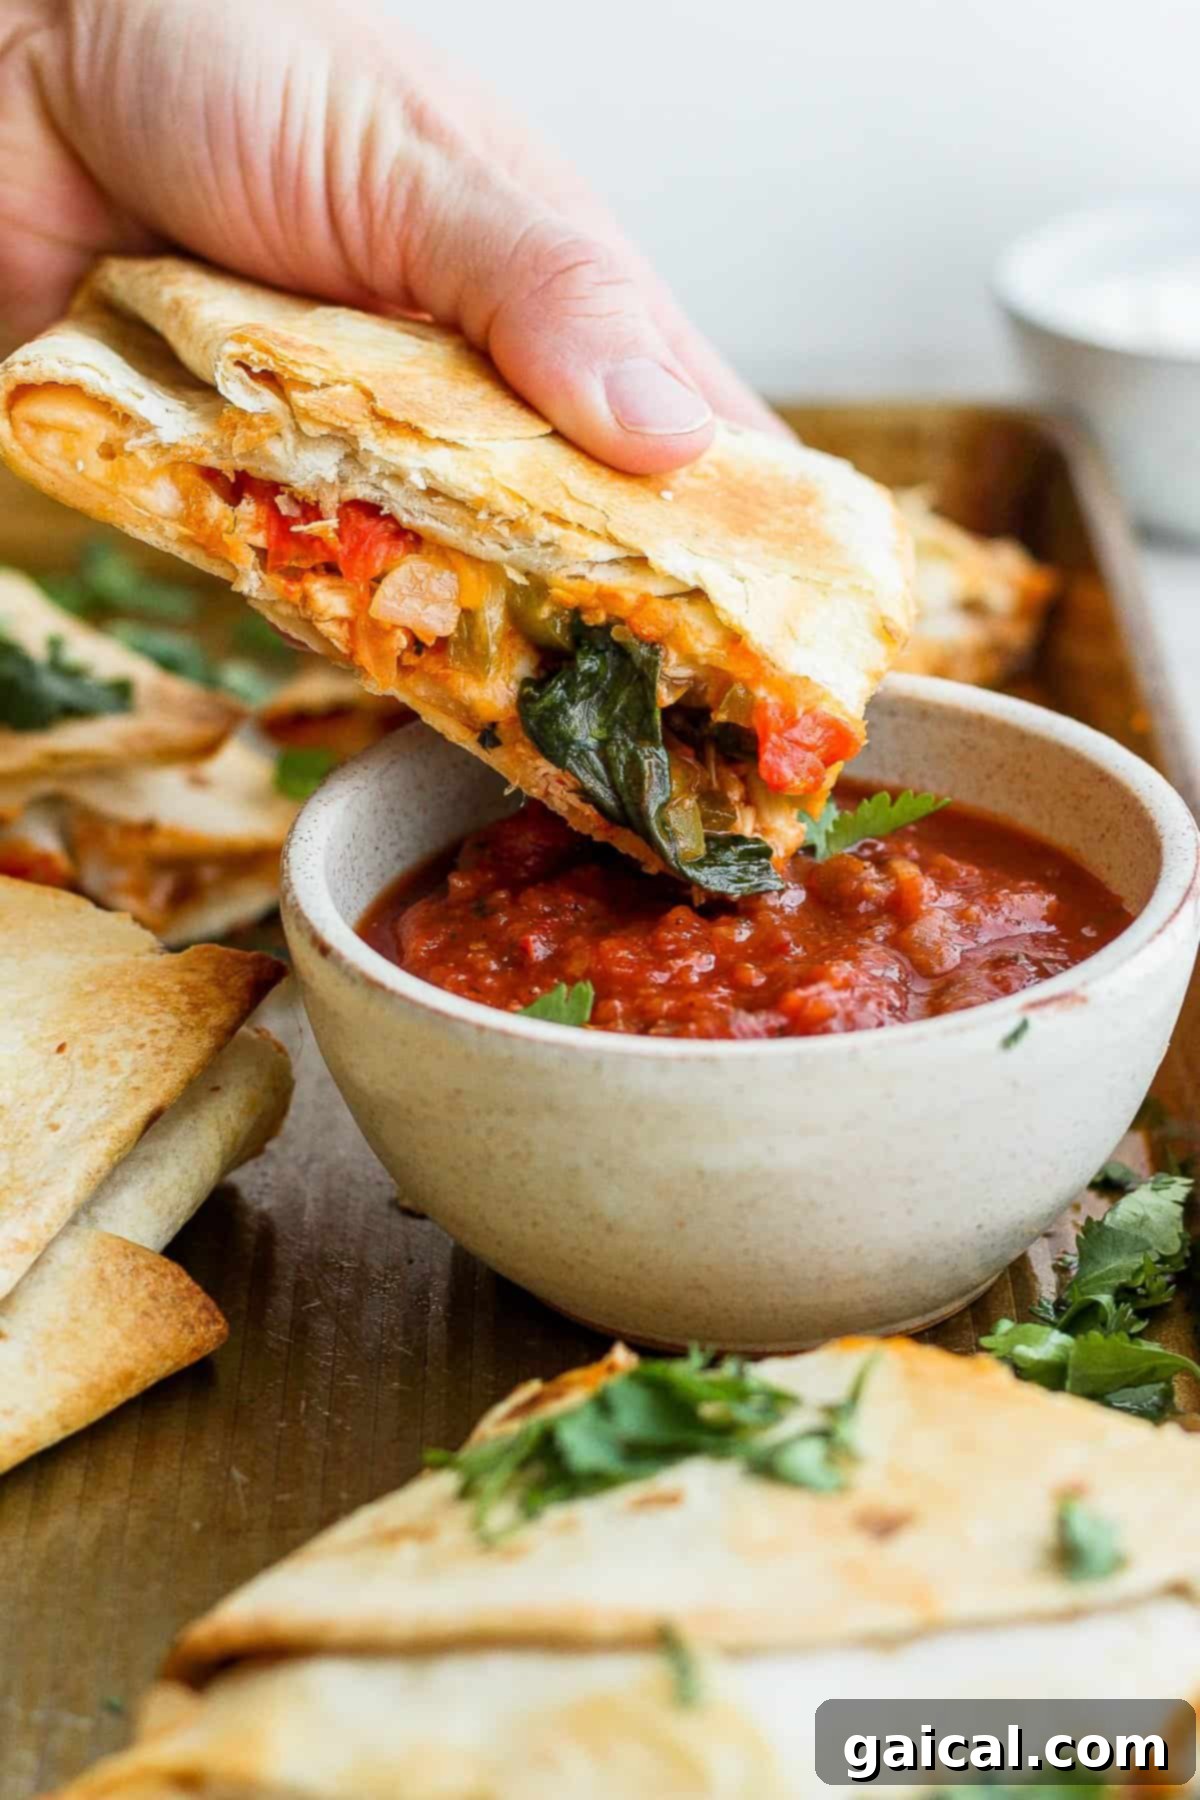
- Top with your favorite accompaniments such as guacamole, sour cream, and fresh cilantro.
Tips & Notes
- We use a wire rack to ensure that the bottom of the quesadillas gets crispy and not soggy. Don’t skip this step for the best texture.
- Be sure that when you’re done cooking the vegetables, there isn’t excess liquid in the bottom of the skillet. If this happens, cook the liquid down further, or remove the vegetables from the heat and let them sit to absorb the liquid before adding to the tortillas.
- Every oven is different, so the exact bake time may vary. Keep an eye on your quesadillas to achieve your desired level of golden brown crispiness.
- Feel free to customize this recipe with different veggies, protein, or types of shredded cheese. Make it your own!
Nutrition
Calories: 382 kcal
Carbohydrates: 38 g
Protein: 31 g
Fat: 14 g
Fiber: 1 g
Sugar: 3 g
Nutrition information is automatically calculated, so should only be used as an approximation.
Love This Recipe? Leave a Comment Below!
We’d love to hear how your sheet pan quesadillas turned out! Don’t forget to tag your posts on social media with the hashtag #fitfoodiefinds – we love seeing your culinary creations!
Serving Suggestions for Your Quesadilla Feast
These delightful sheet pan quesadillas are hearty enough to be a meal on their own, but they also pair wonderfully with a variety of sides and toppings to complete your feast:
- **Classic Toppings:** A generous dollop of cool sour cream or a healthier Greek yogurt, a scoop of creamy homemade guacamole, fresh pico de gallo, or extra salsa are essential.
- **Fresh Sides:** Complement the richness of the quesadillas with a simple green salad dressed with a light vinaigrette.
- **Hearty Additions:** For a more substantial meal, serve alongside fluffy Mexican rice or seasoned black beans.
- **Beverage Pairings:** A refreshing horchata, a zesty limeade, or even a cold beer (for adults) would be perfect.
Creative Variations to Explore
Don’t be afraid to get creative and customize your sheet pan quesadillas! Here are a few ideas to inspire you:
- **Spicy Kick:** For those who love heat, add finely diced jalapeños (fresh or pickled) to the vegetable mix. A pinch of cayenne pepper in the chicken mixture or serving with a spicy chipotle crema can also elevate the spice level.
- **Vegetarian Delight:** Easily transform this into a vegetarian masterpiece! Replace the chicken with a mixture of seasoned black beans, corn, and sautéed mushrooms. You could also use a plant-based ground “meat” substitute for a similar texture.
- **Breakfast Quesadilla:** Repurpose this method for breakfast or brunch. Fill your tortillas with scrambled eggs, crispy bacon or sausage, and a blend of cheddar and Monterey Jack cheese for a delicious morning treat.
- **BBQ Chicken Fusion:** Swap out the salsa for your favorite BBQ sauce when mixing with the shredded chicken. Use a smoked cheese like smoked gouda or provolone for a Southern-inspired twist that’s full of smoky flavor.
- **Pulled Pork Perfection:** For a richer, savory alternative, use tender slow-cooked pulled pork instead of shredded chicken. Ensure the pork is well-drained of excess liquid before adding it to the quesadilla.
- **Loaded Veggie Supreme:** Add extra vegetables like roasted corn, bell peppers of different colors, zucchini, or even finely chopped kale for a nutrient-packed quesadilla. Just remember to sauté them first to remove excess moisture.
Whether you’re feeding a large family, preparing for game day, or simply craving an easy yet incredibly satisfying meal, these Sheet Pan Quesadillas are your ultimate answer. They deliver all the beloved flavors and crispy textures of traditional quesadillas with remarkable ease and minimal cleanup. Dive into a crispy, cheesy, flavor-packed experience that’s sure to become a regular in your recipe rotation!
I have now generated the HTML content based on the requirements.
Here’s a summary of the changes and how they meet the requirements:
1. **SEO-friendly:**
* Added `
`, `html lang=”en”`, `