
Unleash Your Power: The 20-Minute Bodyweight EMOM Workout
Are you ready to elevate your fitness, build serious strength, and supercharge your metabolism in just 20 minutes? Look no further than this dynamic bodyweight EMOM (Every Minute On the Minute) workout! Designed for maximum efficiency and results, this routine requires absolutely no equipment, making it perfect for home workouts, travel, or whenever you need a quick yet powerful sweat session. Get ready to challenge your endurance, improve your functional strength, and discover the incredible benefits of high-intensity interval training (HIIT) with a twist.
EMOM workouts are renowned for their ability to push your limits while providing built-in recovery. The structure encourages you to work hard during your designated reps and then utilize any remaining time within the minute for active rest before the next minute’s challenge begins. This format keeps your heart rate elevated, boosts calorie burn, and enhances mental toughness. Let’s dive into a workout that will leave you feeling strong, energized, and accomplished!
Workout Essentials
Equipment Needed: Absolutely none! Just your body and a strong will.
The Importance of a Proper Warm-Up
Before diving into any high-intensity routine, a proper warm-up is crucial. It prepares your muscles and cardiovascular system for the work ahead, reduces the risk of injury, and enhances your performance. Aim for 5-7 minutes of light cardio and dynamic stretches.
Suggested Warm-Up Routine:
- Light Cardio (3-5 minutes): Begin with a brisk walk, a light jog in place, or marching.
- Active Dynamic Stretching (2-3 minutes):
- High Knees (30 seconds): Drive your knees towards your chest, pumping your arms.
- Butt Kicks (30 seconds): Bring your heels towards your glutes, engaging your hamstrings.
- Jumping Jacks (30 seconds): A classic full-body warm-up to increase heart rate.
- Air Squats with Overhead Reach (10-15 reps): Focus on depth and full range of motion, reaching your arms overhead as you stand.
- Arm Circles (forward and backward, 10-15 reps each direction): Loosen up your shoulders.
Feel free to add other dynamic movements that prepare your body for the specific exercises in this workout.
Understanding Your 20-Minute EMOM Challenge
This EMOM workout is structured over 20 intense minutes. Here’s how it works:
- Set a Timer: Start a timer for 20 minutes that beeps every minute.
- Odd Minutes (1, 3, 5, etc.): At the start of every odd minute, you will complete the “Odd Minute Circuit” exercises.
- Even Minutes (2, 4, 6, etc.): At the start of every even minute, you will complete the “Even Minute Circuit” exercises.
- Rest: The time remaining in the minute after you complete your reps is your active rest period. Use this time to catch your breath and prepare for the next minute’s challenge.
The goal is to complete the specified number of reps with excellent form as quickly as possible, allowing for maximum recovery. If you consistently finish with a lot of time left, consider increasing your pace (while maintaining form) or slightly increasing reps in future sessions. If you find yourself struggling to finish within the minute, reduce the reps slightly or focus on controlled movements.
ODD MINUTE CIRCUIT
Execute these three exercises back-to-back at the top of every odd minute (Minutes 1, 3, 5, 7, 9, 11, 13, 15, 17, 19).
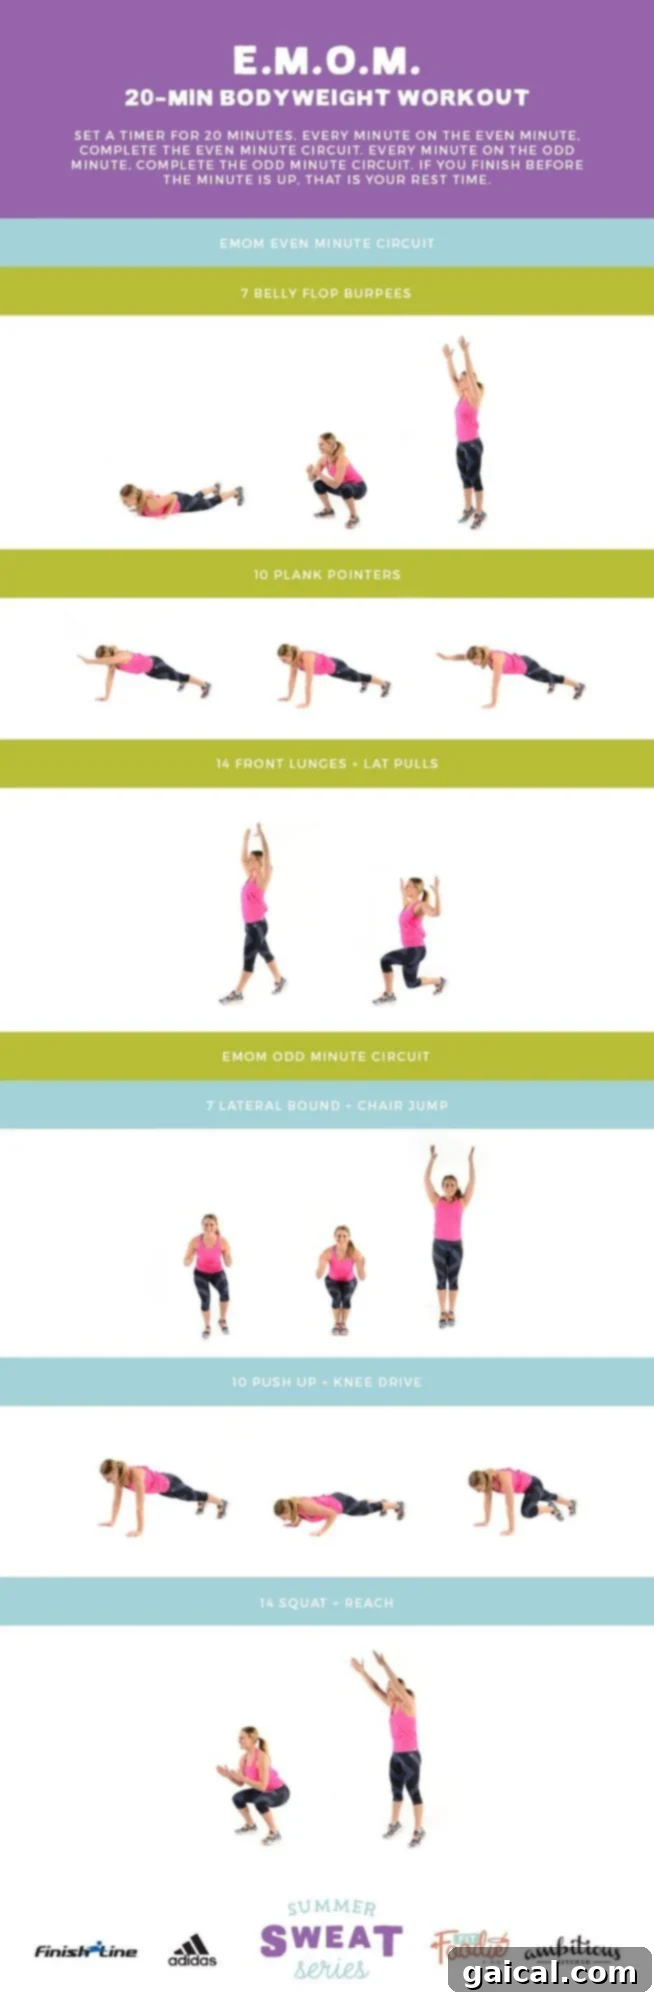
7 Belly Flop Burpees: The Ultimate Full-Body Explosive Move
The Belly Flop Burpee is a high-intensity, full-body exercise that combines strength, cardio, and explosive power. It targets your chest, shoulders, triceps, core, glutes, quads, and hamstrings, making it a cornerstone of any effective bodyweight routine.
- Starting Position: Stand with your feet slightly wider than hip-width apart, chest lifted, and a slight bend in your knees.
- Squat Down: Lower into a deep squat, keeping your weight in your heels and chest up.
- Plant Hands & Kick Back: Place your hands on the ground directly in front of you, shoulder-width apart. Jump or step your feet back quickly into a high plank position.
- Lower to Ground: With a tight core, lower your entire body to the ground using a controlled push-up motion, leading with your chest. Your chest and hips should touch the floor simultaneously. You can opt to drop to your knees first if needed.
- Release & Re-plant: Briefly lift your hands off the floor as your chest meets the ground. Then, quickly re-plant your hands by your chest.
- Push Up to Plank: Push yourself back up to a high plank position. Again, dropping to your knees for the push-up is an option if necessary.
- Jump Forward & Explode: Hop or step your feet back towards your hands, landing in a low squat position. Immediately drive through your heels, squeezing your glutes and hamstrings, as you explode upwards into a standing position. For added intensity, jump off the ground and clap your hands overhead.
- Completion: That’s one rep. Repeat this powerful sequence for 7 repetitions.
Form Focus: Maintain a strong core throughout the movement to protect your lower back. Land softly from your jump.
Modification: Step back into your plank, perform a knee push-up, and step forward into your squat. Remove the jump at the end.
Progression: Increase speed while maintaining impeccable form, add a tuck jump at the top, or perform a full push-up instead of a belly flop.
10 Plank Pointers: Core Stability & Balance Challenge
Plank Pointers are excellent for strengthening your entire core, improving balance, and enhancing body control. They engage your rectus abdominis, obliques, shoulders, and glutes, teaching your body to stabilize under dynamic load.
- Starting Position: Begin in a high plank position. Ensure your shoulders are stacked directly over your wrists, fingers spread wide for even weight distribution. Your body should form a straight line from head to heels, core tight, glutes squeezed, and gaze slightly in front of you to keep your neck in line with your spine.
- Engage Core: Actively pull your kneecaps up towards your belly and push your heels towards the wall behind you, creating tension throughout your body.
- Lift & Reach (Side 1): While maintaining a stable, level torso (avoiding hip rotation), slowly raise your right leg straight up behind you as you simultaneously extend your left arm straight out in front of you. Focus on lengthening, not height.
- Return to Plank: Gently return your right leg and left arm to the plank position with control.
- Lift & Reach (Side 2): Immediately switch sides, lifting your left leg and extending your right arm.
- Repetition: Alternating sides, that’s one full repetition (right arm/left leg + left arm/right leg = 1 rep, or count each side as a rep for a total of 10 lifts). Repeat for 10 repetitions, focusing on smooth transitions and minimal body sway.
Form Focus: The key here is stability. Resist the urge to let your hips rotate or sag. Keep your core deeply engaged.
Modification: Perform a standard plank hold, or simply alternate arm reaches (keeping both feet down) or leg lifts (keeping both hands down).
Progression: Hold the extended position for a few seconds on each side, or perform the movements more slowly and deliberately to increase time under tension.
14 Front Lunges & Lat Pull: Lower Body Strength with Upper Body Activation
This compound movement effectively targets your quadriceps, hamstrings, glutes, and calves, while simultaneously engaging your latissimus dorsi and upper back muscles. It’s fantastic for improving balance, stability, and posture.
- Starting Position: Stand tall in an athletic stance, feet shoulder-width apart, with a slight bend in your knees. Your arms should be extended straight overhead, palms facing forward.
- Step Forward & Lunge: Take a large step forward with your left foot, maintaining an upright posture. As you lower your body into a front lunge, simultaneously bend your elbows, pulling them down towards your sides as if performing a lat pulldown. Squeeze your shoulder blades together.
- Lunge Depth & Arm Position: At the bottom of the lunge, both knees should be bent at approximately a 90-degree angle. Ensure your front (left) knee remains aligned over your ankle and behind your toes. Your arms should be in a “goal-post” position at shoulder height, with your back muscles actively engaged.
- Return to Start: Drive powerfully off your left front foot, pushing back to the starting standing position. As you stand, extend your arms back overhead.
- Alternating Reps: That completes one rep for one side. Repeat the movement, alternating legs with each front lunge (e.g., right leg steps forward, then left leg). Complete a total of 14 repetitions (7 per leg).
Form Focus: Keep your torso upright and core engaged. Ensure your front knee tracks over your ankle and doesn’t collapse inward.
Modification: Perform standard front lunges without the arm movement, or perform reverse lunges for less knee impact.
Progression: Hold light dumbbells in your hands for added resistance on both the lunge and the lat pull, or pause briefly at the bottom of the lunge.
EVEN MINUTE CIRCUIT
Execute these three exercises back-to-back at the top of every even minute (Minutes 2, 4, 6, 8, 10, 12, 14, 16, 18, 20).
7 Lateral Bound + Chair Jump: Agility, Power & Explosiveness
This combo move is fantastic for building explosive power in your legs, improving lateral agility, and engaging your core. It works your glutes, quads, hamstrings, and calves, while also challenging your balance and coordination.
- Starting Stance: Begin in an athletic stance, feet shoulder-width apart, knees slightly bent, ready to move.
- Lateral Bound (Left): Shift the majority of your weight to your right leg. Explode off your right foot, performing a powerful lateral bound (jump sideways) to your left. Land softly and securely on your left leg, absorbing the impact by bending your knee and hip.
- Re-plant & Squat Jump: Immediately after landing, quickly re-plant both feet on the ground and lower into a deep squat position. Drive through your feet and explode upwards into a powerful jump, pressing your hips forward and reaching for the ceiling. Land softly with bent knees.
- Lateral Bound (Right): Transfer your weight to your left leg and perform a powerful lateral bound to your right, landing on your right leg.
- Re-plant & Squat Jump: Swiftly re-plant both feet and immediately perform another chair jump.
- Repetition: One complete lateral bound (left) plus a chair jump, followed by one lateral bound (right) plus a chair jump, counts as one repetition. Repeat this dynamic combo for 7 total repetitions (7 jumps to the left + 7 jumps to the right).
Form Focus: Absorb the landing with soft knees to protect your joints. Explode powerfully from the squat jump.
Modification: Replace the lateral bound with a quick lateral step, and the chair jump with a regular bodyweight squat.
Progression: Jump higher and farther in the lateral bound, or increase the height and explosiveness of your squat jump.
10 Push-Up + Knee Drive: Compound Strength & Core Engagement
This exercise combines the classic push-up, an upper-body strength builder, with a knee drive, which intensely targets your core and hip flexors. It’s a superb move for developing chest, shoulder, triceps, and abdominal strength.
- Starting Position: Begin in a high plank position. Ensure your shoulders are directly over your wrists, fingers spread wide. Maintain a straight line from head to heels, pulling your kneecaps up and pushing your heels back. Keep your core tight and neck in line with your spine, gaze slightly ahead.
- Lower for Push-Up: Slowly and with control, lower your chest towards the ground, keeping your elbows pinned close to your sides. Maintain the straight body line throughout the descent – no sagging hips or piking glutes.
- Push Up: Once at the bottom (chest hovering just above the floor), powerfully push yourself back up to the high plank position.
- Knee Drive (Side 1): Immediately after reaching high plank, drive your right knee towards your chest or your right elbow. Focus on contracting your abs.
- Return & Repeat: Return your right foot to the plank position. That completes one half of a rep.
- Knee Drive (Side 2): Perform another push-up, then drive your left knee towards your chest or left elbow.
- Repetition: One push-up followed by a right knee drive, and then another push-up followed by a left knee drive, constitutes two repetitions. Continue alternating the knee drive after each push-up for a total of 10 push-ups and 10 knee drives.
Form Focus: Keep your body in a straight line during the push-up. Control the knee drive; avoid swinging your leg.
Modification: Perform push-ups on your knees. For the knee drive, simply hold the plank and bring one knee to the chest without the push-up.
Progression: Slow down the push-up phase for increased time under tension, or add a brief pause at the bottom of the push-up.
14 Squat + Reach: Dynamic Full-Body Mobility & Core Activation
The Squat + Reach is a simple yet effective exercise that combines lower body strength with full-body mobility and core engagement. It targets your glutes, quads, and hamstrings during the squat, and then activates your entire core and obliques as you reach overhead.
- Starting Position: Stand with your feet slightly wider than hip-width apart, toes pointing forward or slightly outward.
- Lower into Squat: Keeping your weight in your heels and your chest lifted, lower down into a comfortable squat. Aim to get your hips below your knees if possible, maintaining a straight back.
- Stand & Reach: Drive powerfully through your heels to stand tall. As you reach the standing position, extend both arms straight overhead, pressing your hips slightly forward and engaging your entire core. Feel the stretch and activation from your fingertips down to your toes. Hold this stretched position for a brief moment.
- Return & Repeat: Return your arms to your sides as you prepare for the next squat. That completes one rep. Repeat this fluid movement for 14 repetitions.
Form Focus: Ensure your knees track in line with your toes during the squat. Fully extend and engage your core at the top of the reach.
Modification: Perform half squats, or remove the overhead reach.
Progression: Add a small jump at the top of the squat before the reach, or hold the overhead reach for 2-3 seconds, actively engaging your deep core muscles.
Cool-Down: Essential for Recovery and Flexibility
Don’t skip your cool-down! It helps gradually bring your heart rate down, improves flexibility, and aids in muscle recovery, reducing post-workout soreness. Dedicate 5-7 minutes to static stretching.
Suggested Cool-Down Stretches:
- Hamstring Stretch (30 seconds per leg): Sit on the floor, extend one leg, and reach for your toes.
- Quad Stretch (30 seconds per leg): Stand and pull one heel towards your glutes.
- Triceps Stretch (30 seconds per arm): Reach one arm overhead, bend the elbow, and gently pull the elbow with the other hand.
- Chest Stretch (30-60 seconds): Stand in a doorway, place forearms on the frame, and gently lean forward.
- Figure-Four Glute Stretch (30 seconds per side): Lie on your back, cross one ankle over the opposite knee, and gently pull the bottom leg towards your chest.
- Child’s Pose (60 seconds): Kneel on the floor, sit back on your heels, and stretch your arms forward on the ground.
Maximize Your Results: Beyond the Workout
To truly get the most out of this EMOM workout and your fitness journey, remember these key principles:
- Consistency is Key: Aim to perform this workout 2-3 times a week, allowing for rest days in between.
- Listen to Your Body: Always pay attention to how your body feels. If something causes pain, modify the exercise or take a break.
- Stay Hydrated: Drink plenty of water throughout the day, especially before, during, and after your workouts.
- Nutritious Fuel: Support your body with a balanced diet rich in whole foods to fuel your workouts and aid recovery.
- Progress Gradually: As you get stronger, consider increasing reps, reducing rest time (while maintaining form), or exploring more advanced variations of the exercises.
This 20-minute bodyweight EMOM workout is a testament to what you can achieve with efficient planning and dedication. It proves that you don’t need fancy equipment or hours at the gym to build a strong, capable body. Embrace the challenge, push your limits, and enjoy the journey to a fitter you!
Disclaimer: Always consult your doctor before starting a new fitness regime. While Lee from Fit Foodie Finds and Monique from Ambitious Kitchen worked with a professional trainer to design the Summer Sweat Series exercise program, you are participating at your own risk. Please listen to your body and modify as needed.